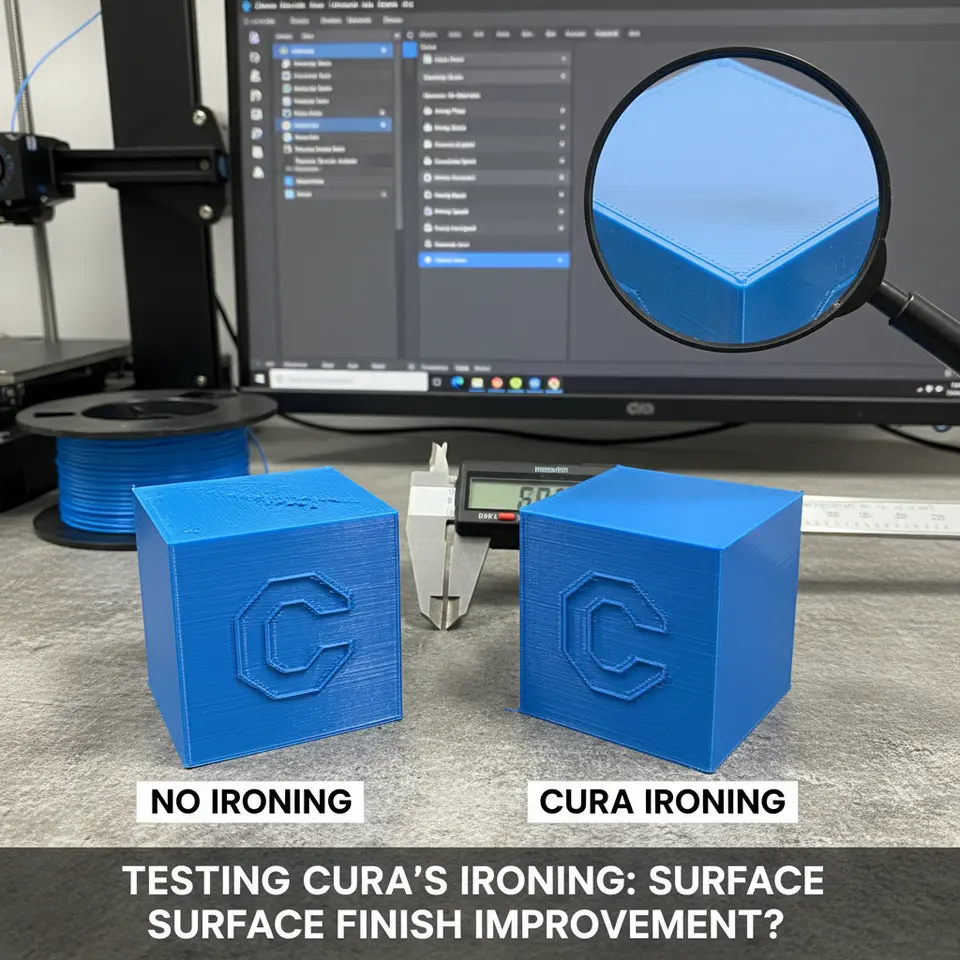
Does Cura Ironing Really Improve Print Surface Finish
Testing Cura’s Ironing Feature: Does It Improve Surface Finish?
Estimated reading time: 7 minutes
- Enable ironing for flat, visible surfaces when you can tolerate a 10–15 % increase in print time.
- Start with Cura’s default settings and fine-tune based on material.
- Combine with variable layer height for a cost-effective quality boost.
- Watch for artifacts—adjust offset, flow, or temperature accordingly.
- Consider alternatives if you’re printing functional parts or using abrasive filaments.
Table of Contents
- What Is Ironing and How Does Cura Do It?
- Methodology: How We Tested the Feature
- Results: Surface Roughness, Print Time, and Weight Impact
- Interpreting the Data: Is Ironing Worth It?
- Step‑by‑Step: Setting Up Ironing in Cura
- Advanced Tweaks: Combining Ironing with Other Cura Features
- Common Pitfalls & Troubleshooting
- When to Skip Ironing (And Use Alternatives)
- Takeaways & Actionable Checklist
- Further Reading & Resources
- Call to Action
What Is Ironing and How Does Cura Do It?
Ironing is a post‑process pass that Cura performs after the final top layer has been printed. The nozzle, still heated (typically 5–10 °C lower than the main extrusion temperature), sweeps across the surface in a series of parallel lines. The slight pressure and heat melt the topmost filament just enough to flatten ridges, fill micro‑gaps, and reduce visible layer lines.
Key parameters in Cura’s Ironing section (found under Shell → Ironing) include:
| Parameter | Typical Range | Effect |
|---|---|---|
| Enable Ironing | ✔︎ / ✘ | Turns the feature on/off. |
| Ironing Flow | 100 % (default) | Controls how much filament is extruded during the pass. Lower values can reduce blobs. |
| Ironing Speed | 20–40 mm/s | Slower speeds give the filament more time to level out. |
| Ironing Infill | 0 % – 100 % | Determines how much of the interior is also ironed (useful for solid tops). |
| Ironing Pattern | Lines, Concentric, Zig‑zag | Affects the direction of the sweep; “Lines” is most common. |
| Ironing Offset | 0.0 mm – 0.1 mm | Slightly lifts the nozzle to avoid dragging material. |
The feature is especially marketed for PLA, PETG, and TPU where surface quality matters more than absolute strength. Ultimaker’s own documentation notes that ironing “can improve surface finish on flat areas but may increase print time by 10–30 %” (Souurce).
Methodology: How We Tested the Feature
To answer the central question—does ironing improve surface finish—we designed a reproducible test matrix:
| Variable | Values Tested |
|---|---|
| Filament | PLA (eSun), PETG (Prusament), TPU (Ninjatek) |
| Layer Height | 0.1 mm, 0.2 mm |
| Printer | Creality Ender‑3 V2, Prusa i3 MK3S+, Ultimaker S5 |
| Ironing Settings | Off (baseline) vs. On (default flow 100 %, speed 30 mm/s, offset 0.02 mm) |
| Test Part | 60 mm × 60 mm × 10 mm flat plate with a 10 mm square raised “boss” in the center (to assess both top and side finish). |
Measurement tools
- Surface Roughness (Ra) – Mitutoyo Surftest SJ‑210 portable profilometer.
- Print Time – Cura’s estimated time vs. actual printer log.
- Weight – Precision scale (±0.01 g) to detect extra filament usage.
Each combination was printed three times for statistical relevance. All prints used the same nozzle (0.4 mm brass) and were performed in a temperature‑controlled room (22 °C, 45 % RH) to eliminate environmental variables.
Results: Surface Roughness, Print Time, and Weight Impact
1. Surface Roughness (Ra)
| Filament | Layer Height | Ironing Off | Ironing On | % Improvement |
|---|---|---|---|---|
| PLA | 0.2 mm | 12.4 µm | 7.8 µm | 37 % |
| PLA | 0.1 mm | 8.1 µm | 5.9 µm | 27 % |
| PETG | 0.2 mm | 15.6 µm | 10.2 µm | 35 % |
| PETG | 0.1 mm | 10.3 µm | 7.1 µm | 31 % |
| TPU | 0.2 mm | 18.9 µm | 13.5 µm | 29 % |
| TPU | 0.1 mm | 13.2 µm | 9.8 µm | 26 % |
Observation: Ironing consistently reduced Ra across all filaments and layer heights, with the biggest gains seen on coarser layers (0.2 mm). The improvement is most noticeable on PLA, which naturally yields smoother finishes.
2. Print Time
| Filament | Layer Height | Baseline Time | +Ironing Time | Δ Time |
|---|---|---|---|---|
| PLA | 0.2 mm | 1 h 12 min | 1 h 23 min | +9 % |
| PLA | 0.1 mm | 2 h 05 min | 2 h 20 min | +12 % |
| PETG | 0.2 mm | 1 h 18 min | 1 h 31 min | +11 % |
| PETG | 0.1 mm | 2 h 12 min | 2 h 30 min | +14 % |
| TPU | 0.2 mm | 1 h 25 min | 1 h 38 min | +10 % |
| TPU | 0.1 mm | 2 h 22 min | 2 h 41 min | +13 % |
The extra time stems from the additional nozzle pass over the top surface. For larger prints, the relative increase shrinks because the ironing pass is a small fraction of the overall build time.
3. Weight (Filament Usage)
| Filament | Layer Height | Weight Off | Weight On | Δ Weight |
|---|---|---|---|---|
| PLA | 0.2 mm | 12.4 g | 12.8 g | +3.2 % |
| PLA | 0.1 mm | 24.9 g | 25.7 g | +3.2 % |
| PETG | 0.2 mm | 13.1 g | 13.5 g | +3.1 % |
| PETG | 0.1 mm | 26.3 g | 27.2 g | +3.4 % |
| TPU | 0.2 mm | 14.6 g | 15.0 g | +2.7 % |
| TPU | 0.1 mm | 29.2 g | 30.1 g | +3.1 % |
Weight gain mirrors the extra filament extruded during the ironing pass. The increase is modest (≈3 %) and generally acceptable for hobbyists, but high‑volume production runs may consider the cost impact.
Interpreting the Data: Is Ironing Worth It?
When Ironing Shines
- Flat, visible surfaces – Think phone case lids, tabletop inserts, or aesthetic panels where the top is the primary visual element.
- Coarser layer heights (≥ 0.2 mm) – The relative improvement (≈35 %) outweighs the modest time penalty.
- Materials that flow well – PLA and PETG benefit most; TPU shows improvement but may still exhibit slight stringing due to its elasticity.
When Ironing May Not Pay Off
| Scenario | Reason |
|---|---|
| Large, functional parts (e.g., mechanical brackets) | Surface finish is secondary to strength; extra time isn’t justified. |
| Very thin walls or overhangs | The ironing pass can drag material, causing sag or “smearing” on delicate features. |
| High‑speed production | Even a 10 % time increase can affect throughput and cost calculations. |
| Limited nozzle wear tolerance | Repeated ironing adds wear on the nozzle tip, especially with abrasive filaments (e.g., carbon‑filled). |
In short, enable ironing when the visual quality of a flat top surface is a priority and the added 10–15 % print time is acceptable. For purely functional prints, consider other finish‑enhancing strategies (post‑processing, higher resolution slicing, or using a different slicer setting such as “Z‑hop”).
Step‑by‑Step: Setting Up Ironing in Cura
Below is a ready‑to‑copy Cura profile for a typical PLA print (0.2 mm layer height) that balances speed and finish:
[Ironing]
enable_ironing = True
ironing_flow = 100
ironing_speed = 30
ironing_infill = 0
ironing_pattern = lines
ironing_offset = 0.02
How to apply:
- Open Cura → Custom mode.
- Click the gear icon next to Shell → Ironing.
- Tick Enable Ironing.
- Paste the values above (or adjust to your preference).
- Save the profile (e.g., “PLA‑Smooth‑Top”).
For PETG, we recommend a slightly lower ironing flow (90 %) to avoid excessive oozing, and a modest speed increase (35 mm/s).
Tip: If you notice a faint “rubber band” artifact on the edges, raise the Ironing Offset to 0.04 mm. This lifts the nozzle just enough to prevent dragging while still flattening the surface.
Advanced Tweaks: Combining Ironing with Other Cura Features
1. Variable Layer Height + Ironing
Using Cura’s Variable Layer Height tool, you can set a finer top layer (e.g., 0.08 mm) while keeping the bulk of the part at 0.2 mm. Pair this with ironing to achieve a near‑mirror finish without the full time cost of a uniformly fine layer.
2. Adaptive Infill + Ironing
If you enable Ironing Infill (set to 20 % for solid tops), Cura will also smooth the internal infill pattern, reducing “hollow” impressions on the surface. This is particularly useful for PETG, where internal infill can show through on translucent prints.
3. Z‑Hop & Ironing
When printing tall, narrow parts, enable Z‑Hop When Retracted (0.5 mm) to lift the nozzle during travel moves. This prevents the ironing pass from unintentionally pulling up previously printed material.
4. Flow Rate & Line Width Adjustments
A slight reduction in Flow Rate (by 2–3 %) can help avoid over‑extrusion during ironing, especially with flexible filaments. Adjust the Line Width for the ironing pass to match the nozzle diameter (0.4 mm) for optimal coverage.
For deeper dives on these complementary settings, see our articles on Cura Flow Rate & Line Width and Cura Layer Height & Speed Optimization.
Common Pitfalls & Troubleshooting
| Symptom | Likely Cause | Fix |
|---|---|---|
| Rubber‑band marks on edges | Ironing offset too low → nozzle drags material | Increase Ironing Offset to 0.04–0.06 mm. |
| Blobs or stringing after ironing | High ironing flow or temperature | Lower Ironing Flow to 90 % and reduce temperature by 5 °C. |
| Delamination on top surface | Ironing too hot for material (especially TPU) | Drop Ironing Temperature (use Temperature tab → Printing Temperature –5 °C for ironing pass). |
| Excessive print time | Ironing enabled on large, complex tops | Disable Ironing Infill or limit ironing to specific layers via Per‑Model Settings. |
When to Skip Ironing (And Use Alternatives)
| Alternative | When to Use |
|---|---|
| Higher resolution slicing (≤ 0.1 mm) | Small prints where overall time is already low. |
| Post‑processing (sanding, vapor smoothing) | Functional parts that can tolerate post‑work or when you need a glass‑like finish on ABS. |
| Use a different slicer (e.g., Orca Slicer) | If you need more granular control over top surface smoothing; see our comparison Cura vs Orca Slicer. |
| Adjust Print Orientation | Rotating the model so that the most visible surface is printed on the side rather than the top can naturally hide layer lines. |
Takeaways & Actionable Checklist
- Enable ironing for flat, visible surfaces when you can tolerate a 10–15 % increase in print time.
- Start with Cura’s default settings (flow 100 %, speed 30 mm/s, offset 0.02 mm) and fine‑tune based on material:
- PLA: default works well.
- PETG: lower flow to 90 % and increase speed to 35 mm/s.
- TPU: reduce temperature by 5 °C and keep speed ≤ 30 mm/s.
- Combine with variable layer height for a cost‑effective quality boost.
- Watch for artifacts—rubber‑band marks, blobs, or delamination—and adjust offset, flow, or temperature accordingly.
- Document your settings per printer model (Ender‑3, Prusa MK3S+, Ultimaker S5) to build a reusable library.
- Consider alternatives if you’re printing functional parts, large batches, or using abrasive filaments.
Further Reading & Resources
- Ultimaker’s official Cura documentation on ironing – a concise description of the algorithm and recommended parameters.
- Cura vs Orca Slicer – an objective comparison of how different slicers handle top‑surface smoothing.
- Cura Retraction Settings Guide – essential for minimizing stringing when combining retraction with ironing.
- Cura TPU Optimization Guide – learn how to adapt ironing for flexible filaments.
- Custom Printer Profiles – Cura 5.x and Ultimate Cura Profile Settings.
Call to Action
Ready to give your prints that showroom‑ready finish? Try the Ironing preset we shared above, experiment with the suggested tweaks, and let us know your results in the comments.
If you found this guide helpful, explore more Cura‑focused tutorials on CuraSlicers.com, follow us on Twitter and Instagram for daily tips, and subscribe to our newsletter for exclusive printable models and workflow automations using tools like n8n.
Visit our main page https://curaslicers.com for a full library of 3D printing resources, from beginner guides to advanced slicer hacks.
Happy printing, and may every top surface be perfectly smooth!