Cura 3D Model Repair Missing Surfaces Fix in Your Slices
If you’re into 3D printing, you’ve likely encountered a frustrating issue: missing surfaces in your 3D model slices. This can result in incomplete prints, holes, or weak structures. Luckily, Cura, the popular 3D slicing software by Ultimaker, offers multiple ways to repair models and ensure smooth, error-free printing. In this guide, we’ll dive deep into how to identify, diagnose, and fix missing surfaces in your 3D models using Cura.
Understanding Missing Surfaces in 3D Models
Missing surfaces often occur when a 3D model has non-manifold geometry. Non-manifold edges happen when:
- Two faces share the same edge inappropriately.
- The model has internal faces or floating vertices.
- There are holes or gaps in the mesh.
These issues confuse slicing software like Cura, causing it to misinterpret the model and skip certain surfaces during slicing. The result? Partial prints, structural weakness, or even failed prints.
Common signs of missing surfaces in Cura:
- Incomplete layer previews in Cura’s slicer view.
- Holes appearing where solid surfaces should exist.
- Printing stops or layers missing during actual print.
By recognizing these signs early, you can save time, filament, and frustration.
Step 1: Preparing Your Model for Cura
Before diving into repair tools, ensure your 3D model is exported correctly. Cura supports STL, OBJ, and 3MF formats. Sometimes, missing surfaces originate from poor exports in 3D modeling software like Blender, TinkerCAD, or Fusion 360.
Tips for model preparation:
- Always check your model in its native software for mesh errors.
- Apply transformations (scale, rotation) before exporting.
- Remove duplicate vertices and unnecessary internal faces.
By starting with a clean model, you reduce the chances of slicing errors in Cura.
Step 2: Using Cura’s Built-In Mesh Fix Tools
Cura has several built-in features to detect and fix missing surfaces:
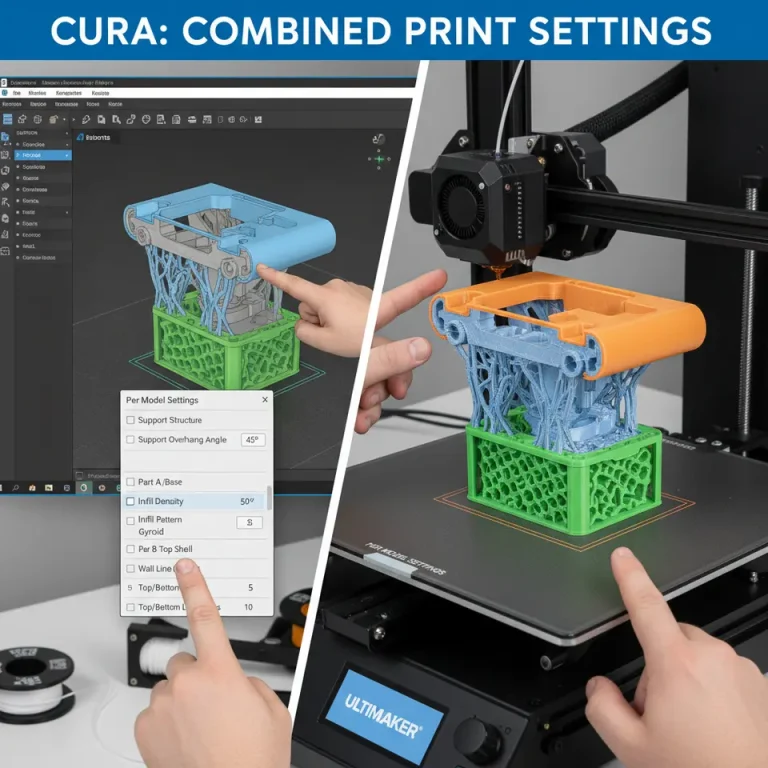
2.1 “Mesh Fixes” in Cura
- Open Cura and load your 3D model.
- Go to the “Mesh Fixes” section in the right-hand settings panel.
- Enable these options:
- Fix Horrible: Automatically fixes non-manifold edges and small gaps.
- Remove All Holes: Closes holes smaller than a certain threshold.
- Merge All Overlapping Faces: Ensures faces that occupy the same space are merged.
Cura will process your model and attempt to repair inconsistencies before slicing.
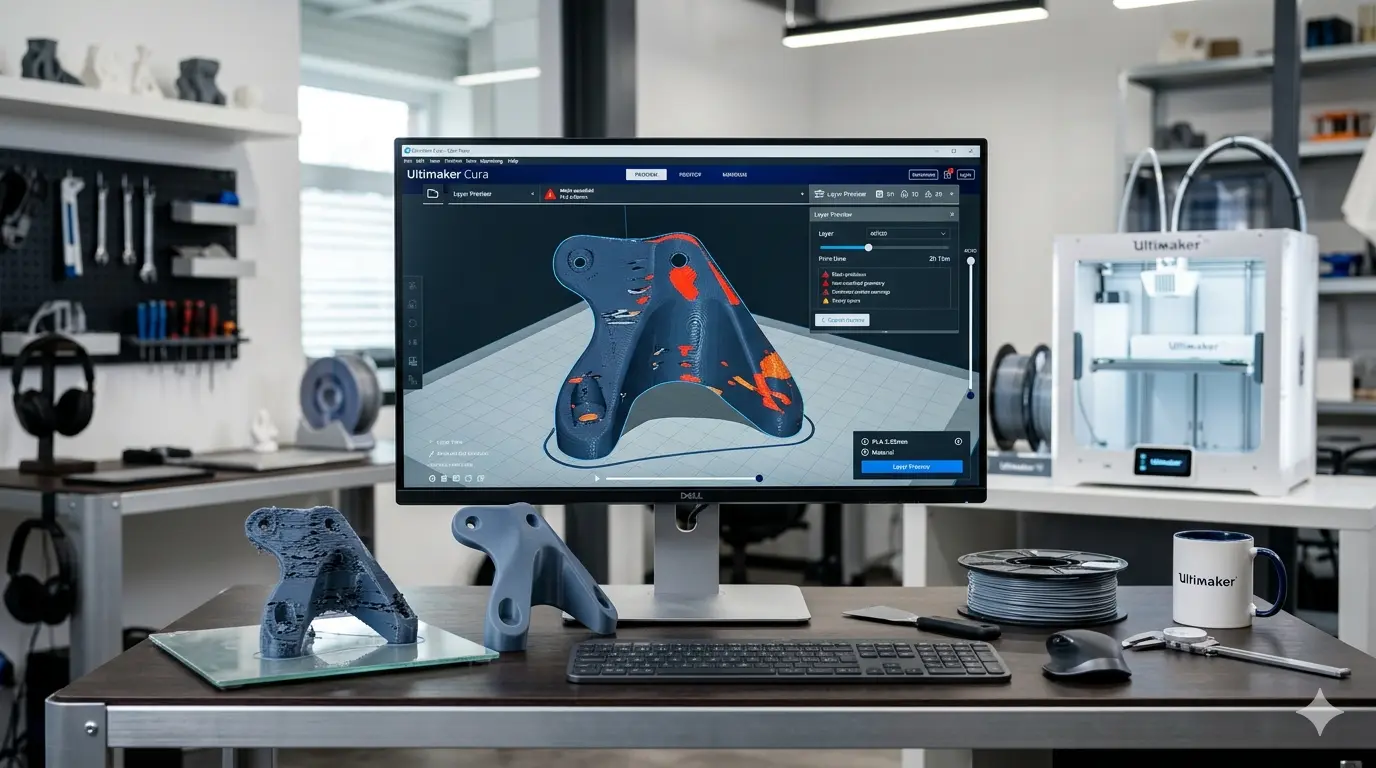
2.2 Checking Model Integrity in Cura
After enabling mesh fixes:
- Switch to Layer View to inspect the model slice by slice.
- Look for any remaining missing surfaces. Cura’s visual preview highlights gaps in layers.
- If errors persist, consider exporting the repaired model and further repairing it in dedicated software.
Step 3: Using External 3D Repair Tools
Sometimes Cura alone cannot fix serious mesh errors. External repair tools are essential for advanced problems:
3.1 Meshmixer
- Import your STL into Meshmixer.
- Navigate to Analysis → Inspector.
- Meshmixer automatically detects holes and non-manifold surfaces.
- Click Auto Repair All to fix missing surfaces, then export for Cura.
3.2 Netfabb Online
- Autodesk Netfabb offers a free online repair tool.
- Upload your model and let Netfabb analyze and repair errors.
- Download the fixed STL for slicing in Cura.
These tools work well for complex models that Cura cannot repair internally.
Step 4: Manual Fixes in 3D Modeling Software
For advanced users, manual editing ensures the highest quality repair:
- Open the model in software like Blender or Fusion 360.
- Identify missing faces or gaps. In Blender, you can use Select → Non-Manifold to highlight problematic edges.
- Fill holes manually using face creation tools.
- Re-export as STL and re-import into Cura.
This method gives full control over the geometry, especially for intricate designs where automatic fixes may distort the model.
Step 5: Preventing Missing Surfaces in Future Prints
Prevention is better than repair. Follow these practices:
- Design with manifold geometry: Avoid overlapping faces or thin disconnected shells.
- Check for non-manifold edges in your 3D modeling software before exporting.
- Use Cura preview to inspect slices thoroughly.
- Export in 3MF format when possible, as it preserves more mesh information than STL.
Implementing these steps reduces the likelihood of slicing errors and improves print success.
Step 6: Final Tips for Cura Users
- Always update Cura to the latest version; mesh repair algorithms improve over time.
- For large models, enable “Fix Horrible” and “Remove All Holes” simultaneously for best results.
- Inspect models in layer view, not just in 3D view. Many gaps are only visible when sliced.
- Consider splitting complex models into smaller parts; smaller meshes are easier to repair and slice.
Conclusion
Fixing missing surfaces in Cura doesn’t have to be frustrating. By understanding the causes, using Cura’s mesh repair features, leveraging external repair software like Meshmixer or Netfabb, and practicing careful model design, you can ensure high-quality, reliable 3D prints every time.
Whether you’re printing small figurines or functional prototypes, mastering Cura 3D model repair and missing surface fixes will save you time, filament, and frustration. Start integrating these repair techniques into your workflow, and watch your prints improve significantly.