Optimizing Cura Profiles for Overnight Printing
Estimated Reading Time: 5 minutes
Key Takeaways:
- Understanding the unique challenges of overnight printing can lead to successful prints.
- Key Cura settings like layer height, print recovery, and temperature management are essential for reliability.
- Regular maintenance and inspection can prevent common issues during unattended printing.
- Customizing profiles for specific materials maximizes quality and reduces failure risks.
Table of Contents:
Understanding the Challenges of Overnight Printing
Overnight printing can present unique challenges, including material fatigue, temperature inconsistencies, and potential obstructions during the print job. Therefore, tailoring your Cura profiles is essential. Here are some of the most common challenges:
- Long Print Times: Extended run times increase the risk of power outages and mechanical failures.
- Temperature Fluctuations: Leaving a printer running overnight can result in temperature variations, impacting print quality.
- Material Limitations: Some filaments can degrade when subjected to prolonged heat.
To tackle these challenges effectively, consider the following Cura settings and practices.
Key Cura Settings for Overnight Prints
1. Layer Height and Print Speed Configuration
Choosing the appropriate layer height and print speed can significantly influence print times. A thicker layer height can reduce print time while ensuring stability. However, it’s crucial to balance speed with layer adhesion. For overnight prints, a moderate setting of 0.2 to 0.3 mm layer height is often ideal, ensuring quality while speeding up the process.
Choosing the appropriate layer height and print speed can significantly influence print times. A thicker layer height can reduce print time while ensuring stability. However, it’s crucial to balance speed with layer adhesion. For overnight prints, a moderate setting of 0.2 to 0.3 mm layer height is often ideal, ensuring quality while speeding up the process.
2. Use of Brim and Raft
The first layer is critical for adhesion. Utilizing a brim not only increases the surface area of the first layer but also helps ensure the model stays anchored on the print bed. Meanwhile, a raft can provide additional stability, especially for taller models or those with smaller footprints.
The first layer is critical for adhesion. Utilizing a brim not only increases the surface area of the first layer but also helps ensure the model stays anchored on the print bed. Meanwhile, a raft can provide additional stability, especially for taller models or those with smaller footprints.
For detailed instructions on how to effectively use brim and raft settings, refer to our brim strategies for tiny parts.
3. Enable Print Recovery Options
Configure your printer for power-loss recovery if your printer supports it. This feature allows the printer to save its state, meaning it can resume printing from where it left off if the power goes out. Check your firmware settings to ensure this feature is activated.
Configure your printer for power-loss recovery if your printer supports it. This feature allows the printer to save its state, meaning it can resume printing from where it left off if the power goes out. Check your firmware settings to ensure this feature is activated.
4. Calibration Checks
Before starting your print, ensure that the bed is properly leveled and that the nozzle height is correctly calibrated. For a successful first layer, consider running a test print with a simple model to confirm the settings.
Before starting your print, ensure that the bed is properly leveled and that the nozzle height is correctly calibrated. For a successful first layer, consider running a test print with a simple model to confirm the settings.
5. Temperature Management
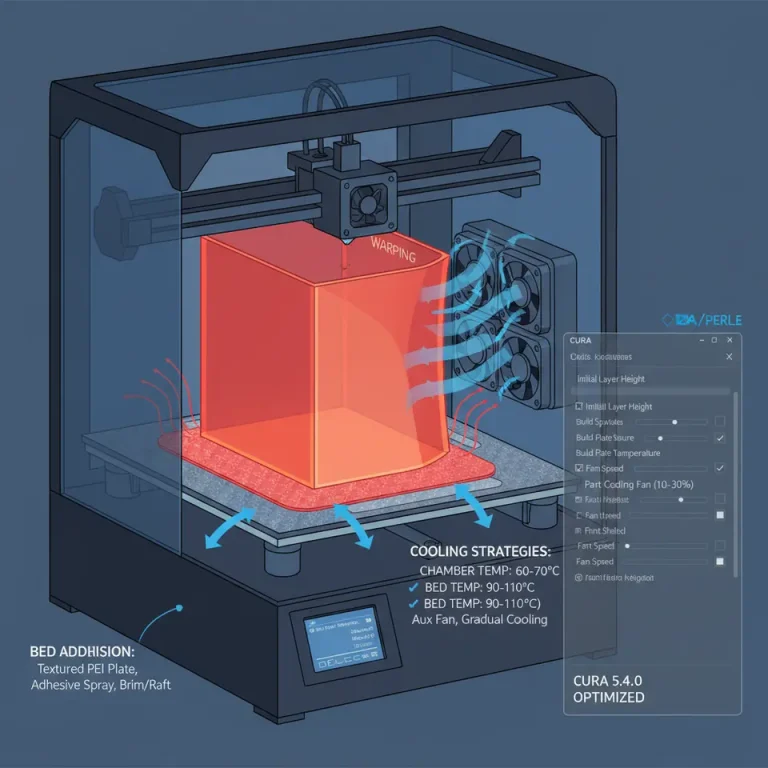
For filaments that are sensitive to heat, consider lowering the nozzle and bed temperatures slightly during overnight prints, provided it still meets the material requirements. This practice can help avoid filament degradation and warping.
For filaments that are sensitive to heat, consider lowering the nozzle and bed temperatures slightly during overnight prints, provided it still meets the material requirements. This practice can help avoid filament degradation and warping.
6. Cooling and Fan Settings
Adjust your cooling fan settings carefully because poor cooling can lead to warping or failing layers. For long prints, incrementally increasing the cooling fan speed as the layers build up ensures the material cools adequately.
Adjust your cooling fan settings carefully because poor cooling can lead to warping or failing layers. For long prints, incrementally increasing the cooling fan speed as the layers build up ensures the material cools adequately.
7. Extended Tool Paths
Use Cura’s extended tool path feature to reduce the risk of overheating. By creating longer, more efficient paths, you can also minimize time spent traveling between print areas, helping maintain lower temperatures.
Use Cura’s extended tool path feature to reduce the risk of overheating. By creating longer, more efficient paths, you can also minimize time spent traveling between print areas, helping maintain lower temperatures.
8. Using Adaptive Layers
The adaptive layers feature allows for variations in layer height, thus potentially speeding up prints without sacrificing quality. For an idea on how to set this up, explore our article on adaptive layers optimization.
The adaptive layers feature allows for variations in layer height, thus potentially speeding up prints without sacrificing quality. For an idea on how to set this up, explore our article on adaptive layers optimization.
Customizing Your Cura Profile for Reliability
Creating a reliable Cura profile involves selecting settings that enhance reliability and output quality. Here are some additional tips:
- Material-Specific Settings: Customize profile settings for the filament you are using, as each has its specifications and tolerances. For instance, PLA may require different retraction settings compared to PETG or ABS. Review our detailed guide on achieving the best results for various materials.
- Reduced Acceleration and Jerk Settings: Slowing down the printer’s acceleration can prevent jerk-related issues. Consider setting your max acceleration between 500-800 mm/s² based on your printer’s specifications.
- Print Priority Considerations: If running multiple prints, prioritize jobs based on complexity. Simpler designs can often run alongside more complicated prints without interference.
Troubleshooting Tips for Unattended Printing
Even with the best settings, issues can arise during unattended printing. Here are a few troubleshooting tips to keep in mind:
- Watch for Filament Jams: Ensure that your filament spool can rotate freely. Issues here can cause ‘out of filament’ errors before your print has finished.
- Inspect the Print Surface for Adhesion: If you notice prints lifting or failing midway, it might be time to reconsider your adhesion strategy.
- Regular Maintenance: Consistent cleaning of your nozzle and extruder will ensure that prints maintain quality and reduce the chances of filament getting stuck.
Conclusion
By implementing these expertly tailored Cura profiles for overnight and unattended prints, you can maximize the reliability of your 3D printing process. Each recommended setting and practice can help mitigate failure risks, allowing you to wake up to a successful print job or return from a day out to find your project flawlessly completed.
For further insights on ensuring reliable and successful prints, you may want to follow our guide on fixing common slicing errors or check our main page for more resources on optimizing your 3D printing experience.
Ensure you’re following us on social media for the latest updates, tips, and tricks to enhance your 3D printing journey. Happy printing!
For those just starting or looking for additional tips, our comprehensive guide about the basics of the Cura slicer is an excellent place to begin: What is Cura Slicer: A Beginner’s Guide. This resource will solidify your understanding of Cura software as you embark on your projects.
For more information, visit our homepage at CuraSlicers.com.