Mastering the Cura Slicer Workflow for 3D Printing
Cura Slicer Workflow: From CAD Export to Printable G-code (Best File Formats & Pipelines
Estimated Reading Time: 7 minutes
- Master the Cura slicer workflow for high-quality 3D prints.
- Understand best file formats and export techniques from CAD programs.
- Perform mesh integrity checks for optimal print quality.
- Implement automated workflows to streamline your 3D printing process.
- Utilize our downloadable checklist to ensure print-ready designs.
Table of Contents
- Understanding CAD Export: File Formats Matter
- Mesh Integrity Checks: Ensuring Printability
- Automating Your Workflow: End-to-End Examples
- Downloadable Checklist for Designers
- Conclusion
- FAQ
Understanding CAD Export: File Formats Matter
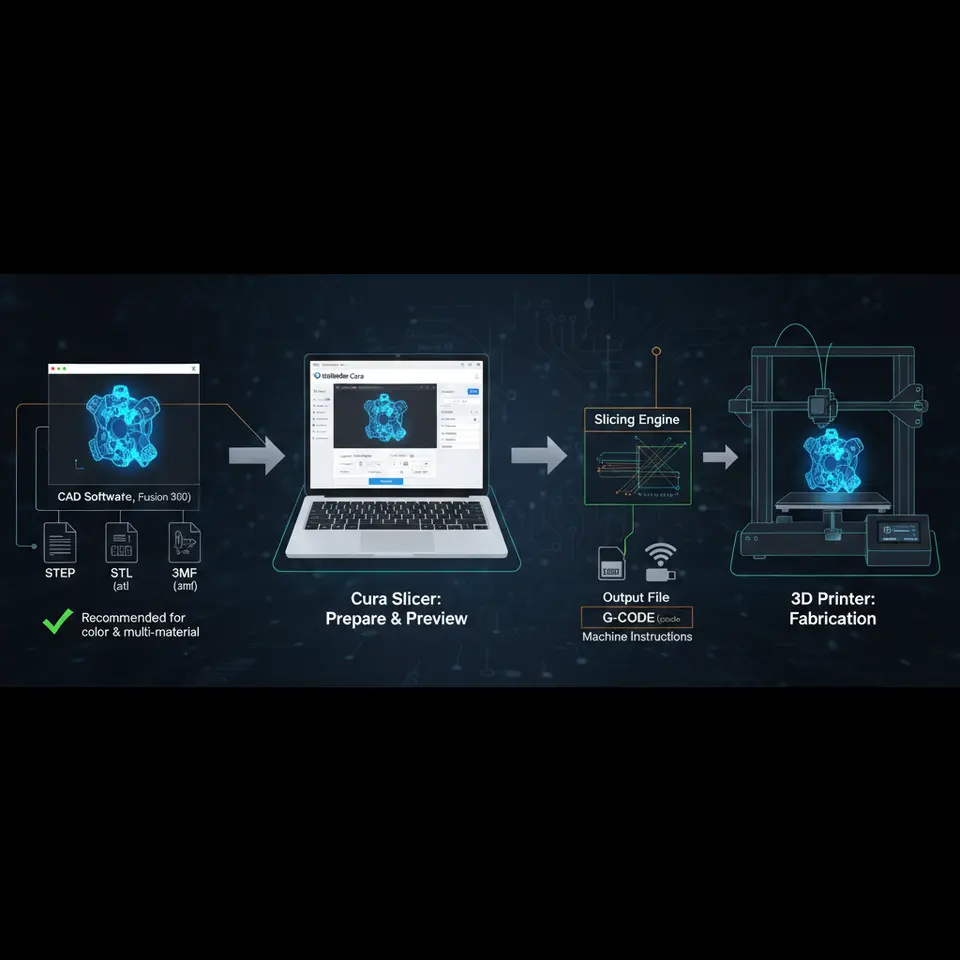
When preparing your model for 3D printing, the file format you choose for export is crucial. Ultimaker Cura supports a variety of file types, but some are better suited than others for ensuring high-quality prints. Let’s take a closer look at the most commonly used file formats:
Common File Formats for 3D Printing
- STL (Stereolithography): The most widely used file format for 3D printing. It stores 3D models as a mesh of triangles. While STL is versatile, it does not carry color or texture information.
- OBJ (Object File): This format supports both geometry and texture. It is ideal for models that require complex textures or color differentiations.
- 3MF (3D Manufacturing Format): A newer format designed to overcome some limitations of STL, 3MF supports color, textures, and more complex elements. It’s perfect for detailed prints with multiple components.
- FBX (Filmbox): Typically used in the gaming industry and 3D modeling, FBX can store animated elements and is more complex than the other formats. It’s less common for 3D printing but occasionally used for models needing animation.
- AMF (Additive Manufacturing File Format): An advanced format that accommodates multiple materials and colors. Like 3MF, it provides more options for complex designs but might require specific slicer support.
When to Use Each Format
- For simple geometry: Use STL for quick and easy exports, especially if you need to ensure compatibility across various slicer software.
- For detailed models: Choose OBJ or 3MF when your design has colors and textures that need to be preserved.
- Complex assemblies: Consider AMF if your print requires multiple materials or colors and it’s supported by your slicer.
Practical Takeaway:
Before exporting your model, carefully evaluate the requirements of your project and choose a format that aligns with your needs. For most standard prints, STL remains a solid choice for ease of use.
Mesh Integrity Checks: Ensuring Printability
Once you’ve exported your CAD model, the next step is checking for mesh integrity. Any errors in your model can lead to failed prints or subpar quality. Common issues include non-manifold edges, flipped normals, or holes in the mesh.
Tools for Mesh Checks
- Netfabb: A popular tool for analyzing STL files. It offers capabilities to repair common issues automatically.
- Meshmixer: A versatile program that provides tools for repairing meshes and optimizing models for printing.
- Cura’s built-in features: Before slicing your model, Cura will often alert you to potential mesh issues, so it’s wise to review those warnings.
Decimation and Scaling
Decimation involves reducing the number of polygons in a mesh while preserving its overall shape and detail. This reduction is crucial for enhancing slicing performance and print speed, especially for complex models.
- Use Tools: Leverage tools like Blender or Meshmixer to decimate models without significant loss of detail.
- Scaling Up for Prints: When scaling your model, always check the dimensions to ensure accuracy before exporting. Cura offers tools to calibrate your print size when importing models.
Practical Takeaway:
Conduct thorough mesh checks and scaling adjustments using dedicated software to ensure your model is optimized before moving to Cura. This can save time and frustration with printing errors down the line.
Automating Your Workflow: End-to-End Examples
To enhance your efficiency, consider automating parts of your workflow. This can involve setting up a pipeline that integrates CAD software, export formats, and Cura settings so that you can streamline repetitive tasks.
Example Pipeline: From Blender to Cura
- Design in Blender: Create your model and ensure it is correctly textured if necessary.
- Export as STL: During export, check ‘Selection Only’ to export only the desired object.
- Run a Mesh Check in Netfabb: Analyze your STL file for errors and repair any issues.
- Import into Cura: Load the STL into Cura, adjust your slicer settings as necessary.
- Prepare for Printing: Once satisfied with layer settings and supports, export your G-code.
Automation via n8n
Consider using automation platforms like n8n to create workflows that can automate repetitive tasks, reducing manual intervention for routine printing setups. For example, you can automate file transfers from your design software to Cura or even automate adjustments based on parameters you frequently change.
Practical Takeaway:
Creating an automated pipeline can drastically reduce the time spent on routine tasks. Explore tools like n8n to find ways to streamline your workflow from CAD to G-code.
Downloadable Checklist for Designers
To help streamline your process, we are offering a downloadable checklist that summarizes the essential steps from exporting CAD files to preparing them for slicing in Cura. This resource includes:
- Recommended file formats for specific use cases.
- Key mesh integrity checks to perform.
- Guidelines for scaling and decimation processes.
- Steps to prepare your workflow and automate with tools like n8n.
Conclusion
Navigating the process from CAD export to creating printable G-code with the Cura slicer workflow doesn’t have to be daunting. By understanding file formats, performing necessary mesh checks, and implementing efficient pipelines (including automation tips), you can maximize your success in 3D printing.
For more in-depth guides, explore our articles on the best Cura settings for Ender 3 and how to optimize Cura settings for PETG, PLA, and ABS.
Stay updated with the best practices and enhance your 3D printing journeys by following us on social media and subscribing for future guides.
For further information, visit the CuraSlicers homepage for more tips and resources.
External Resource: For detailed insights on file formats and their respective uses, refer to Ultimaker’s official documentation.
Embrace the full potential of your 3D printing capabilities with an optimized workflow today!
FAQ
What is the best file format for 3D printing?
The best file format often depends on your specific project requirements. However, STL is generally considered a solid choice for most standard 3D prints.
How do I check mesh integrity?
You can check mesh integrity using tools like Netfabb and Meshmixer, or by using the built-in features of Cura to identify potential issues.
Can I automate my 3D printing workflow?
Yes, you can automate your 3D printing workflow using platforms like n8n to create efficient pipelines that reduce repetitive tasks.
Where can I download the checklist?
You can download the checklist by clicking on the link provided in the section above titled “Downloadable Checklist for Designers.”