Mastering Cura Slicer: A Beginner’s 2025 Guide
Complete Guide to Cura Slicer for Beginners (2025 Edition)
Estimated reading time: 10 minutes
- Understand how to install and set up Ultimaker Cura.
- Learn essential slicing concepts and settings for optimal prints.
- Get troubleshooting tips for common printing issues.
- Create and save custom profiles for future projects.
- Explore automation options with n8n for enhanced workflows.
Table of Contents
- Getting Started: Installation & System Requirements
- Navigating the Cura Interface – A Quick Tour
- Core Slicing Concepts Every Beginner Must Know
- Essential Cura Settings: Speed, Infill, Supports, and More
- Creating Your First Print – Step‑by‑Step Workflow
- Troubleshooting Checklist – Common Issues & Fixes
- Saving & Sharing Profiles – Building a Library for Future Projects
- Automation Boost: Linking Cura with n8n for Seamless Workflows
- Next Steps & Resources
1. Getting Started: Installation & System Requirements
| Platform | Minimum Specs | Recommended Specs |
|---|---|---|
| Windows 10/11 | 2 GHz CPU, 4 GB RAM, 500 MB free disk | Quad‑core CPU, 8 GB RAM, SSD |
| macOS 11+ | 2 GHz CPU, 4 GB RAM | Apple Silicon (M1/M2) or Intel i5+, 8 GB RAM |
| Linux (Ubuntu 20.04+) | 2 GHz CPU, 4 GB RAM | 8 GB RAM, GPU acceleration (optional) |
- Download the latest Cura version from the official site – https://ultimaker.com/software/ultimaker-cura.
- Run the installer and follow the wizard.
- First launch will prompt you to create a free Ultimaker account (optional but enables cloud sync).
- Add your printer – Cura ships with a library of over 1,500 pre‑configured printers. If your model isn’t listed, you can create a custom profile using the “Add Printer” wizard.
Pro tip: For Creality or other budget printers, start with the “Custom FDM printer” template and fill in build volume, nozzle size, and filament diameter. This ensures the slicer respects your machine’s limits from day one.
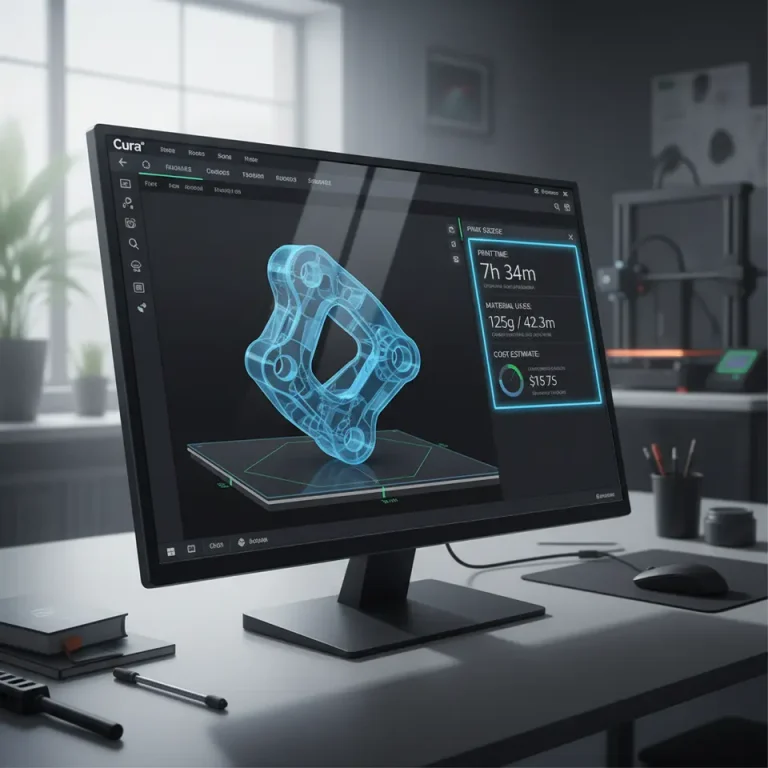
2. Navigating the Cura Interface – A Quick Tour
Cura’s UI is intentionally clean, but a few panels hold the keys to powerful control:
| Panel | What It Does | Quick Action |
|---|---|---|
| Toolbar (top) | Access to file import, save, print, and marketplace plugins. | Click the Marketplace icon to install the *OctoPrint Connection* plugin for remote printing. |
| 3D Viewport (center) | Visual preview of the sliced model, color‑coded by layer. | Right‑click → *Layer view* to scrub through each layer. |
| Settings Sidebar (right) | All slicer parameters, grouped by *Recommended*, *Custom*, and *Advanced* tabs. | Toggle the Custom tab to unlock hidden settings like *Combing Mode* and *Z Hop*. |
| Print Setup (left) | Quick‑access to basic parameters: layer height, wall thickness, infill, supports. | Drag the *Layer Height* slider for instant preview updates. |
| Status Bar (bottom) | Shows estimated print time, material usage, and any warning messages. | Hover over the warning icon for a detailed list of potential issues. |
Spend a few minutes hovering over each icon; Cura stores your last used layout, so you won’t have to relearn the UI each session.
3. Core Slicing Concepts Every Beginner Must Know
Understanding the math behind slicing demystifies why a setting behaves the way it does.
- Layer Height – Determines vertical resolution. A 0.1 mm layer height yields smoother surfaces but doubles the number of layers compared to 0.2 mm, increasing print time.
Research: A study by the University of Sheffield found a diminishing return on surface roughness below 0.08 mm for PLA, while print time rose exponentially (source).
- Wall Thickness & Line Width – Walls (or perimeters) are built from multiple extrusion lines. The default Cura setting of *Wall Thickness = 1.2 mm* with a *Line Width = 0.4 mm* creates three perimeters, balancing strength and print speed.
- Infill Density & Pattern – Infill provides internal support. Common patterns: *Grid*, *Gyroid*, *Honeycomb*. Gyroid offers high strength‑to‑weight ratio at lower densities, ideal for functional parts.
- Print Speed – A global speed multiplier influences travel, outer wall, and infill speeds. Faster prints reduce time but may sacrifice dimensional accuracy and surface finish.
- Supports – Cura can generate *Touching Buildplate* supports (ideal for overhangs) or *Everywhere* supports (for complex geometry). Over‑supporting adds material and post‑processing effort, so start with the minimal needed.
- Retraction – Prevents stringing by pulling filament back during travel moves. Typical values for Bowden setups: *Retraction Distance = 6 mm*, *Retraction Speed = 40 mm/s*.
By mastering these fundamentals, you’ll be able to diagnose why a model looks “wavy” or why a bridge collapses, and you’ll know exactly which Cura knob to turn.
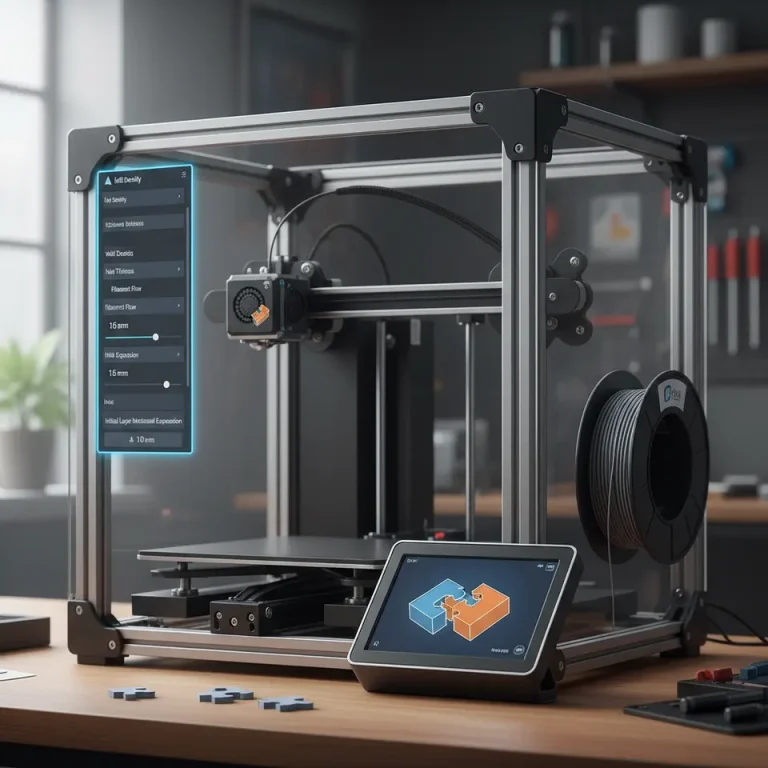
4. Essential Cura Settings: Speed, Infill, Supports, and More
Below is a starter profile that works reliably on most FDM printers (e.g., Ender 3, Prusa i3 MK3, Anycubic Vyper). Adjust values based on your specific machine and filament.
| Setting | Recommended Value (Beginner) | Why It Matters |
|---|---|---|
| Layer Height | 0.2 mm (0.1 mm for fine details) | Balances quality & time |
| Wall Thickness | 1.2 mm (3 perimeters) | Improves part strength |
| Top/Bottom Thickness | 0.8 mm (4 layers) | Prevents hollow spots |
| Infill Density | 20 % (Gyroid) | Strong internal lattice without excess material |
| Print Speed | 60 mm/s (outer walls 40 mm/s) | Faster prints while keeping surface quality |
| Travel Speed | 120 mm/s | Reduces stringing |
| Retraction Distance | 6 mm (Bowden) / 2 mm (Direct) | Eliminates oozing |
| Retraction Speed | 40 mm/s | Quick enough to avoid nozzle clog |
| Build Plate Adhesion | *Brim* (5 mm) for PLA, *Raft* for ABS | Improves first‑layer success |
| Support Placement | *Touching Buildplate* (auto) | Minimal material usage |
| Z Hop When Retracted | Enabled, 0.2 mm | Prevents nozzle dragging on printed parts |
How to Apply These Settings in Cura
- Open Print Settings → switch to Custom mode.
- Use the search bar at the top of the sidebar to locate each parameter quickly.
- For Infill Pattern, select Gyroid from the dropdown.
- Enable Z Hop under Travel → Z Hop When Retracted.
Save this configuration as a profile named “Beginner – All‑Materials”. You can now load it with a single click for any new project.
5. Creating Your First Print – Step‑by‑Step Workflow
Let’s walk through a practical example: slicing a simple calibrated 20 mm cube (the classic test piece for dimensional accuracy).
- Download the STL – Grab the file from our free library: https://curaslicers.com/free-models/calibrated-cube.stl.
- Import into Cura (drag‑and‑drop or File → Open File(s)).
- Scale – Ensure the model is set to 20 mm on each axis (Cura shows dimensions in the Scale panel).
- Position – Center the cube on the build plate using the Move tool.
- Select Profile – Choose the “Beginner – All‑Materials” profile you saved earlier.
- Preview – Click the Preview button to inspect layer paths, support structures, and travel moves.
- Export G‑code – Hit Slice, then Save to File (or Save to Removable Drive if you use an SD card).
- Print – Load the G‑code into your printer, pre‑heat the nozzle and bed, and start the print.
Post‑Print Checklist
| Check | What to Look For | Action |
|---|---|---|
| First Layer Adhesion | Uniform, flat, no gaps | Adjust bed leveling or increase brim width |
| Dimensional Accuracy | Measure with calipers; ±0.1 mm tolerance | Fine‑tune Flow Rate (usually 100 % is correct) |
| Surface Finish | No visible gaps in walls | Increase Wall Overlap to 15 % |
| Stringing | Thin hair‑like filaments between parts | Increase Retraction Distance by 0.5 mm |
By following this workflow you’ll quickly build confidence in Cura’s preview tools and develop an intuition for how each setting translates to the physical print.
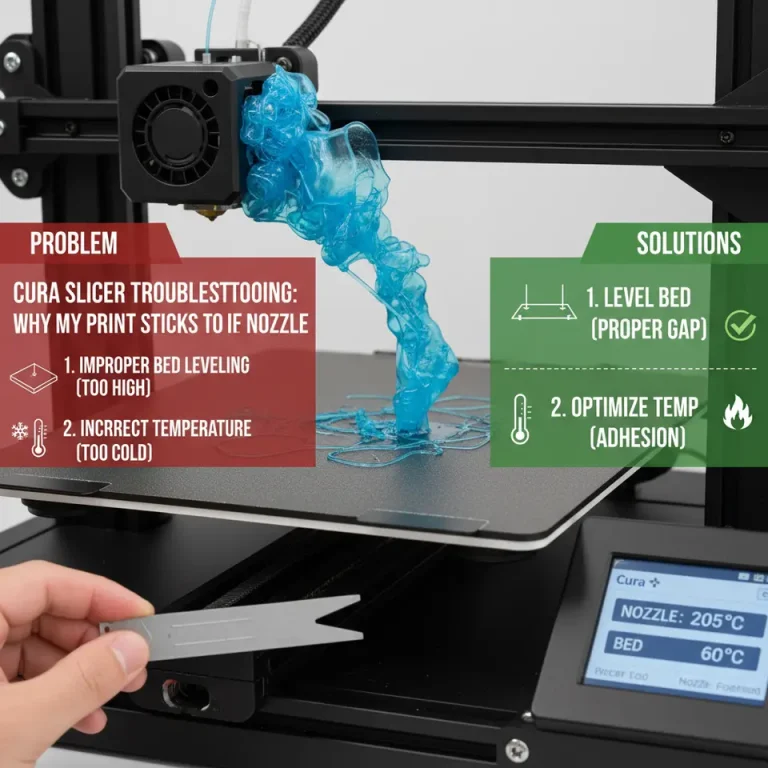
6. Troubleshooting Checklist – Common Issues & Fixes
| Symptom | Likely Cause (Cura Setting) | Quick Fix |
|---|---|---|
| First layer not sticking | Bed temperature too low, Z‑offset too high, insufficient brim/raft. | Raise bed temp by 5 °C, lower Z‑offset by 0.05 mm, enable *Brim* (10 mm). |
| Over‑extrusion (blobs, rough surface) | Flow rate > 100 %, line width too high. | Set *Flow* to 100 % and line width to *Nozzle Diameter*. |
| Under‑extrusion (gaps, weak layers) | Retraction too aggressive, filament diameter mismatch. | Reduce *Retraction Distance* by 0.5 mm, verify filament diameter in *Material Settings*. |
| Stringing | Retraction speed too low, travel speed too low. | Increase *Retraction Speed* to 45 mm/s, raise *Travel Speed* to 130 mm/s. |
| Layer shifting | Print speed too high for printer’s mechanical limits. | Lower *Print Speed* to 40 mm/s, enable *Combing Mode* = *Within Infill*. |
| Warpage on large prints | Insufficient bed adhesion, cooling fan too high. | Use *Raft* or larger *Brim*, set *Cooling Fan Speed* to 0 % for first few layers. |
| Z‑hop causing gaps | Z‑hop height too large relative to layer height. | Set *Z Hop Height* to 0.1 mm (half of layer height). |
Reference: The 3D Printing Handbook (3rd ed., 2024) confirms that most print failures can be traced back to three core parameters—temperature, flow, and speed—reinforcing the importance of systematic troubleshooting (source).
7. Saving & Sharing Profiles – Building a Library for Future Projects
Cura lets you export and import settings as .json files, making it simple to share a calibrated profile with teammates or the community.
- Export – In the *Profile* dropdown, click the gear icon → *Export*.
- Import – To load a profile, click the same gear icon → *Import* and select the .json file.
Best Practices for Profile Management
| Practice | Reason |
|---|---|
| Name profiles descriptively (e.g., “PLA‑0.2 mm‑Fast”) | Quick identification in multi‑printer environments. |
| Version control – add a date suffix (e.g., “_2025‑10”) | Tracks changes after firmware updates. |
| Store on cloud – use Cura’s *Sync Settings* feature with your Ultimaker account. | Access your profiles from any workstation. |
You can also publish your profiles on CuraSlicers.com’s Community Settings page, where other users can rate and comment on them. This not only helps the ecosystem but also positions you as a contributor to the 3D‑printing knowledge base.
8. Automation Boost: Linking Cura with n8n for Seamless Workflows
Even beginners can benefit from a touch of automation. n8n (pronounced “n-eight‑n”) is an open‑source workflow engine that can stitch together Cura, cloud storage, and notification services.
Simple n8n Flow – “Auto‑Slice & Upload”
- Trigger – *Watch Folder* node monitors a Dropbox folder for new STL files.
- Cura CLI – *Execute Command* node runs CuraEngine slice -j your_profile.json -o output.gcode input.stl.
- Upload – *Google Drive* node stores the resulting G‑code in a “Ready‑to‑Print” folder.
- Notify – *Slack* node sends a message to a channel with a download link.
Why use this?
– Eliminates manual slicing for batch jobs.
– Guarantees every file uses the same calibrated profile, reducing variability.
– Provides instant feedback to the team when a new G‑code is ready.
For a step‑by‑step tutorial, see our article “Automating Cura with n8n: A Beginner’s Workflow” (internal link).
9. Next Steps & Resources
You now have the foundational knowledge to install Cura, configure a reliable beginner profile, slice your first part, and troubleshoot common failures. To deepen your expertise, explore these curated resources:
- Best Cura Settings for Ender 3 – A deep dive into material‑specific tweaks (internal link).
- Understanding Gyroid Infill – Why the Gyroid pattern often outperforms traditional grids (internal link).
- Ultimaker’s Cura Documentation – The official reference for every Cura parameter (external link).
Call‑to‑Action
Ready to put your new Cura skills to the test? Download our free calibrated cube STL, slice it with the starter profile, and share your results on our Discord community. Don’t forget to subscribe to our newsletter for weekly tutorials, and follow CuraSlicers on Twitter, Instagram, and LinkedIn for the latest slicing hacks and workflow automations.
Visit our main page https://curaslicers.com for more 3D‑printing tips, guides, and downloadable profiles.
Happy slicing, and may every layer be perfect!