Generate Supports Wisely with Cura
Estimated Reading Time: 6 minutes
Key Takeaways
- Utilize support blockers to control where supports are generated.
- Implement dense supports in critical areas to enhance stability while minimizing material use.
- Adjust support density and Z distance for optimal adhesion and easier support removal.
- Strategically combine support blockers for effective cleaning and reduced post-processing time.
Table of Contents
Understanding Supports in 3D Printing
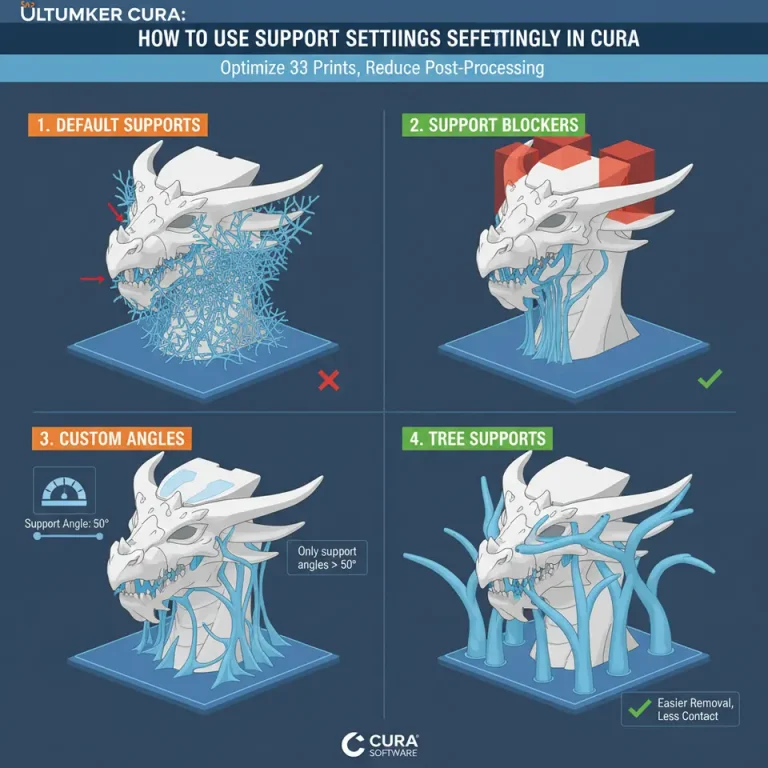
Supports are essential in 3D printing, especially for overhangs and complex geometries. However, excessive support can lead to wasted material, increased print times, and challenging post-processing tasks. Therefore, learning to place supports selectively is vital for an efficient workflow. According to Ultimaker’s official documentation, proper support settings can significantly improve model fidelity and surface finish.
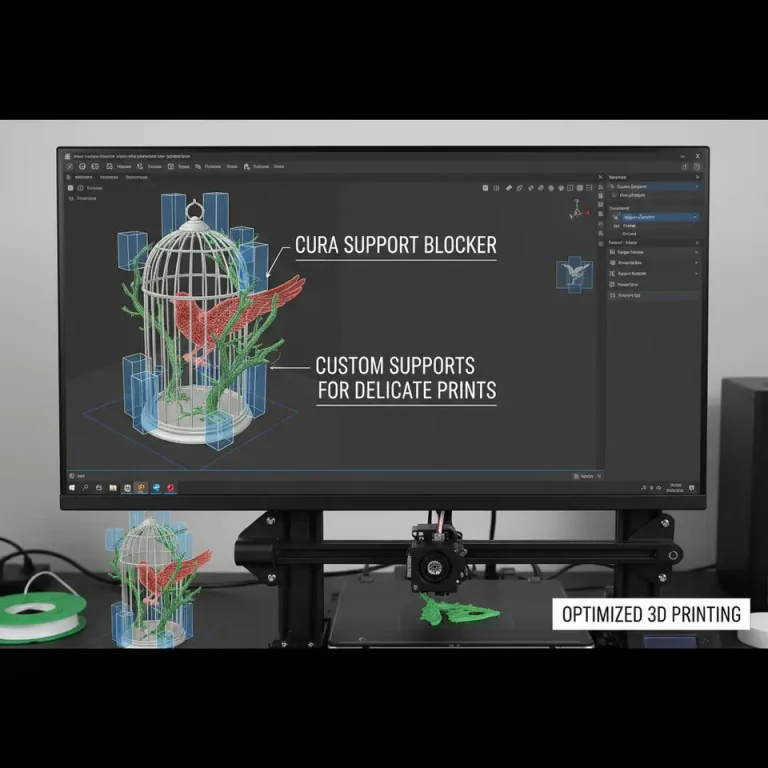
What Are Support Blockers?
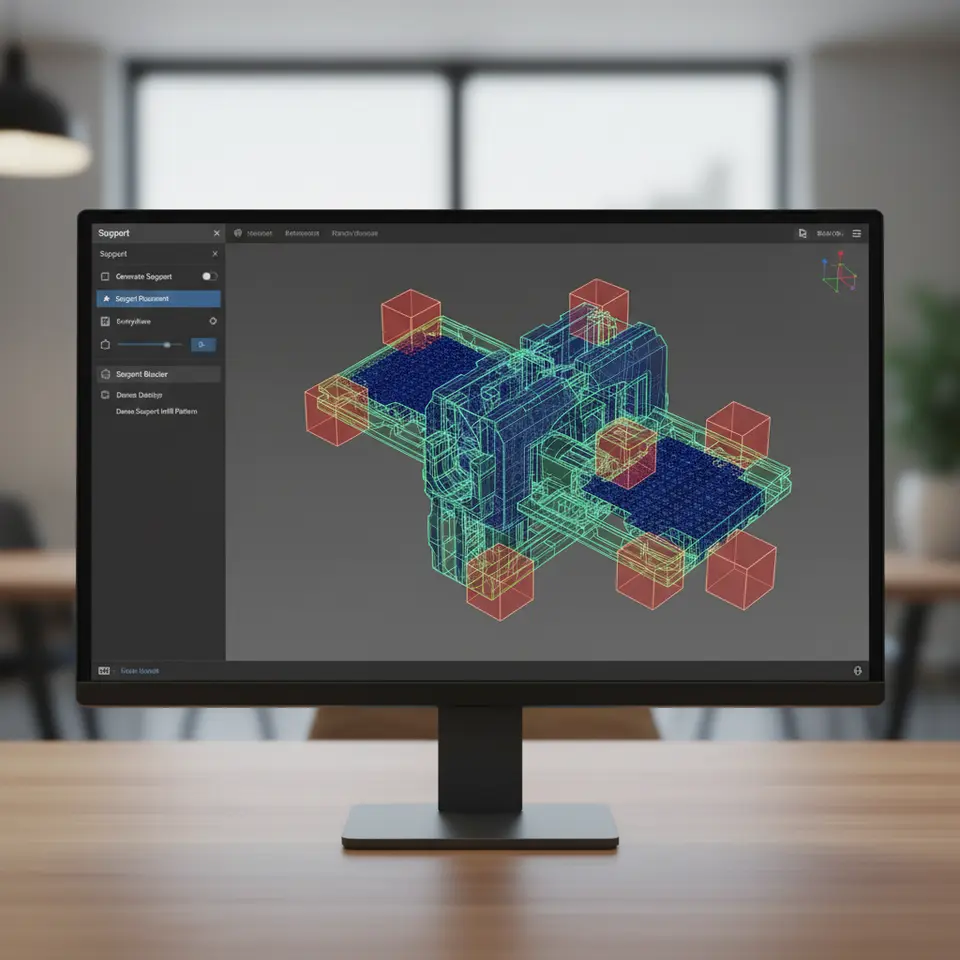
Support blockers are a feature in Cura that allows users to accurately control where supports are generated on a model. They enable you to define specific areas of your 3D print that should not receive support, regardless of the slicing settings. Combined with dense supports, which offer added stability only in critical areas, you can optimize the use of material while ensuring quality.
Why Use Dense Supports?
Dense supports refer to a higher density of support structures in pivotal areas, such as under heavy overhangs or intricate details. By using dense supports paired with minimal bulk supports, you can reduce the overall amount of filament used while ensuring that your print remains stable. This hybrid approach allows for easier removal of supports post-printing, making it an ideal choice for hobbyists and professionals alike.
Getting Started with Support Blockers in Cura
To get the most out of support blockers and dense supports using Ultimaker Cura, follow these practical steps:
Step 1: Load Your Model
- Open Ultimaker Cura.
- Import your 3D model by clicking on the “Open File” button or dragging the file onto the workspace.
Step 2: Enable Supports
- In the right panel, navigate to the “Support” section.
- Toggle “Support Structure” to “Enabled.”
- Select “Grid” or “Line” for the type of support, but you can refine this later with dense supports.
Step 3: Configure Support Settings
- Support Density: Adjust the support density setting. A density of around 15% to 25% is often sufficient, but we will adjust it to dense supports in specific areas later.
- Overhang Angle: Set the overhang angle to determine when supports should be triggered (typically around 45 degrees).
- Support Z Distance: This setting helps to control how much gap exists between the support and the part. A value of 0.1mm to 0.2mm usually works best.
Step 4: Add Support Blockers
- Locate the “Support Blocker” feature by clicking on the “Add Support Blocker” option in the right panel.
- Place the blocker over areas of your model where you do not want supports to be generated.
- You can adjust the size and position of the support blocker to cover small regions as needed.
Step 5: Set Up Dense Supports
- Under the “Support” section, look for “Support Interface” and toggle it on. This feature encapsulates the need for dense supports just beneath the model’s overhangs.
- Adjust the “Support Interface Layer Count” to control how many dense layers are printed at the support’s top (suggested: 3-5 layers).
- Optionally, experiment with the “Support Interface Density,” which can be set higher than regular support density, such as 40% to 60%, to maximize stability.
Step 6: Slice and Preview
- Click the “Slice” button to prepare your model for printing.
- Use the “Layer View” feature to carefully inspect the supports and ensure they only appear where necessary.
Step 7: Save Your Configuration
- Once satisfied with your support layout and configuration, save the settings to your device.
- Proceed to print your model, checking that the printer adheres to the support settings you’ve configured.
Practical Tips for Optimizing Support Use
- Test Different Densities: Always conduct test prints with various support densities to find the right balance for your specific models.
- Adjust Support Z Distance: A larger Z distance may ease the removal of supports post-print.
- Combine Support Blockers Effectively: Strategically placing blockers can save time and effort during clean-up.
- Regular Maintenance: Ensure your printer’s nozzle and bed are calibrated to reduce support adhesion issues.
Common Issues and Troubleshooting
- Support Sticking to Model: If the support is sticking too aggressively to your model, increase the Support Z Distance or consider adjusting the Support Interface Density.
- Weak Supports: If you do not have enough support, increase the Density or add additional dense layers to critical areas.
For users who regularly print complex geometries, becoming familiar with these settings is essential. You can explore our guide on Cura Slicer Support Strategies for Overhangs for more insight.
Conclusion
Utilizing support blockers and dense supports in Ultimaker Cura is a powerful technique to enhance your 3D printing experience. By selectively applying supports where necessary, you not only save on material costs but also ease the post-processing stage.
If you’re eager to dive deeper into optimizing your Cura settings, consider reading our guide on Optimizing Cura Small Cosmetic Prints for techniques that refine your print’s appearance.
FAQ
What are support blockers in Cura?
Support blockers in Cura allow you to specify areas of your model that should not receive any support, which helps optimize material usage.
How can I improve support removal?
To improve support removal, increase the Support Z Distance and consider using dense supports only where necessary to enhance stability without excess adhesion.
What density should I use for supports?
A support density of around 15% to 25% is often sufficient, but you may need to adjust it based on your specific model and the complexity of overhangs.