How Cura Optimizes Sharp Internal Corners
Estimated Reading Time: 5 minutes
Key Takeaways
- Cura effectively manages sharp internal corners through speed reduction and extrusion control.
- Adjusting corner speeds can prevent printing artifacts like blobs and improve layer adhesion.
- Utilize retraction, coasting, and adaptive layer heights to mitigate extrusion issues.
- Experiment with settings and optimize for specific materials to enhance print quality.
- Post-processing techniques can further improve the appearance of printed corners.
Table of Contents
- Understanding Sharp Internal Corners
- Cura’s Approach to Internal Corner Management
- 1. Corner Speed Reduction
- 2. Extrusion Artifacts Mitigation
- Tips for Managing Sharp Internal Corners in Cura
- Common Problems and Solutions
- Conclusion
- FAQ
Understanding Sharp Internal Corners
Sharp internal corners are areas where the print features a significant angle or a sudden change in direction—these can appear when printing complex geometries or intricate designs. The difficulty lies in how the printer’s nozzle must move, which can lead to various issues such as excessive filament extrusion, under-extrusion, or even layer misalignment. Essentially, the speed and flow of the filament can become mismanaged in these areas, causing extrusion artifacts such as stringing and blobs.
Cura’s Approach to Internal Corner Management
Cura tackles internal corner issues through several mechanisms, mainly focusing on two key settings: corner speed reduction and extrusion control. Let’s explore these in detail.
1. Corner Speed Reduction
Cura allows users to adjust corner speeds, which is essential when handling sharp internal corners. When the nozzle approaches a corner, reducing the speed can help:
- Prevent Blobs and Zits: At high speeds, the filament can extrude inconsistently, leading to blobs. By reducing the speed, Cura gives the molten filament enough time to settle, creating a clean transition.
- Enhance Layer Adhesion: Slower speeds enable better inter-layer adhesion for various materials, reducing the risk of weak points in the print.
You can fine-tune the corner speed settings within the “Speed” configuration menu in Cura. This setting is often just a straightforward percentage adjustment from the default print speed. A cautious reduction—between 20-50% slower than your normal print speed—can lead to significant improvements in corner quality.
2. Extrusion Artifacts Mitigation
Extrusion artifacts can occur when the filament is either over-extruded or under-extruded during sharp turns. Cura employs several features to mitigate these artifacts:
- Retraction Settings: Proper retraction can cut down on the filament oozing during travel moves. You can adjust retraction speed and distance in the settings to minimize stringing, especially around corners.
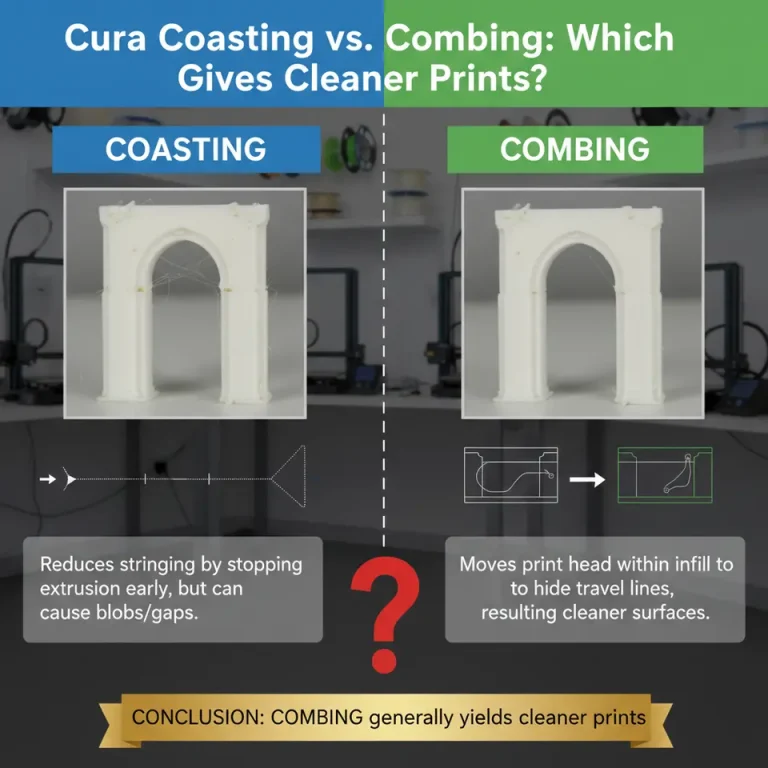
- Coasting: This setting reduces pressure in the nozzle at the end of a path, preventing extra filament from being deposited. This technique is particularly useful at sharp turns where filament control is critical.
- Cura’s Adaptive Layer Heights: If applicable for your model, utilizing adaptive layer heights can create smoother transitions around sharp corners, particularly in intricate models. By adjusting the layer height according to the geometry, you can enhance surface quality.
Tips for Managing Sharp Internal Corners in Cura
- Experiment with Corner and Print Speeds: A trial-and-error approach is often best. Start by experimenting with lowering your corner speeds and see how it affects the output. A speed reduction to around 50% of the standard print speed can yield the best results for intricate designs.
- Optimize Retraction Settings: Fine-tuning your retraction settings for specific materials can also play a crucial role in improving print quality. As every filament brand can behave differently, begin with the manufacturer’s recommendations and adjust based on your findings.
- Utilize Coasting and Other Artifacts Controls: Use coasting wisely, especially with slower print speeds, to improve print quality on internal corners. The Enable Coasting option under the Material settings can be adjusted, typically starting with a value around 0.2 mm.
- Assess Infill Patterns: Certain infill patterns may better suit sharp internal corners than others. For complex geometries, try using a grid or triangular infill for improved stability.
- Post-Processing Techniques: Consider post-processing techniques, such as sanding or using a heat gun, to smooth the corner areas further after printing. This is especially applicable for aesthetic parts where surface quality is crucial.
Common Problems and Solutions
As you navigate through managing sharp internal corners, you may encounter some common issues:
- Blobs: These can be minimized by reducing speed and enabling coasting.
- Stringing: Ensure optimal retraction settings to reduce filament trails between sections of the print, focusing on both speed and distance during movements.
- Uneven Layers: If layer adhesion appears weak, consider modifying print speeds and ensuring your nozzle temperature is calibrated correctly.
Conclusion
Handling sharp internal corners effectively in Cura significantly impacts the quality of your prints. By implementing adjustments to corner speeds, extrusion settings, and retraction parameters, you can ensure that your prints are not only aesthetically pleasing but also structurally sound. This careful management will reduce the occurrences of common extrusion artifacts and enhance the overall reliability of your printing workflow.
For further reading, check out our guides on Cura Support Settings for Overhangs and Optimize Cura for Small Cosmetic Prints. Explore these resources to deepen your understanding and refine your 3D printing expertise.
If you enjoyed this article and want more tips on how to enhance your 3D printing experience, visit our main page at CuraSlicers.com. Don’t forget to follow us on social media to stay updated with the latest in 3D printing technology and workflows!
For more in-depth understanding, you can also refer to Ultimaker’s official documentation on Cura and its various settings.
FAQ
Q: How can I reduce stringing in my prints?
A: Optimizing your retraction settings and reducing print speeds can significantly help in minimizing stringing.
Q: What is coasting in Cura?
A: Coasting is a setting that reduces pressure in the nozzle at the end of a path to prevent extra filament from being deposited, optimizing print quality at sharp turns.
Q: Can I use adaptive layer heights for all models?
A: Adaptive layer heights are most beneficial for intricate models where smoother transitions are needed, but ensure your model is compatible.
Q: How important is corner speed reduction?
A: Corner speed reduction is crucial for maintaining quality at sharp turns, preventing extrusion artifacts, and enhancing overall layer adhesion.