Cura Coasting vs Combing for Cleaner 3D Prints
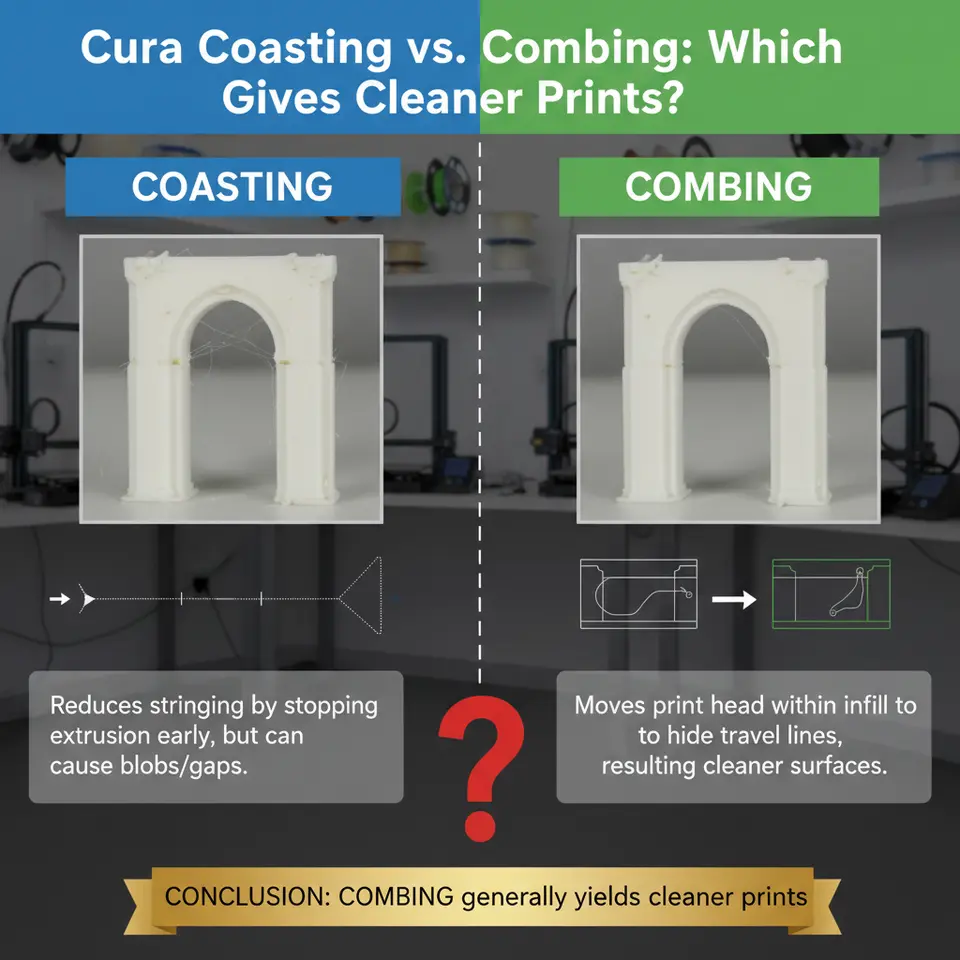
Cura Coasting vs Combing: Which Gives Cleaner Prints?
Estimated reading time: 8 minutes
- Understand the differences between Cura’s Coasting and Combing features for optimal print quality.
- Learn a calibration workflow to reduce blobs and strings during printing.
- Master the settings to enhance the appearance and mechanics of your 3D prints.
Table of Contents
- 1. The Core Problem: Oozing, Blobs, and Stringing
- 2. What Is Cura Coasting?
- 3. What Is Cura Combing?
- 4. Direct Comparison: Coasting vs Combing
- 5. Calibration Workflow – Getting the Best of Both Worlds
- 6. Real-World Example – PLA Miniature Print
- 7. How Coasting and Combing Interact
- 8. Automating the Calibration with n8n
- 9. Frequently Asked Questions
- 10. Quick Reference Cheat Sheet
- 11. Connecting the Dots – More Cura Resources
- 12. Take Action Today
1. The Core Problem: Oozing, Blobs, and Stringing
When the hot‑end finishes extruding a segment of filament, the melt chamber is still under pressure. If the nozzle moves without retracting, the residual pressure pushes extra plastic out of the tip, creating blobs at the start of a new line or strings between distant islands.
- Blobs appear as little bumps on the outer walls, especially noticeable on glossy PLA or PETG.
- Stringing shows up as thin hair‑like filaments connecting separate parts of a model.
Both defects waste material, increase post‑processing time, and can even affect mechanical strength if they accumulate on load‑bearing surfaces.
2. What Is Cura Coasting?
Coasting tells the slicer to stop extruding a small amount of filament just before the end of a travel move. The nozzle continues to move while the pressure in the melt chamber “coasts” forward, using the stored energy to finish the line. When the move ends, the nozzle is already empty, so the subsequent travel produces far less ooze.
| Parameter | Typical Range | Effect |
|---|---|---|
| Coasting Volume | 0.0 – 0.8 mm³ (default 0.0) | Larger values reduce blobs but can cause under‑extrusion at the start of the next line. |
| Coasting Speed | 0 – 100 % of print speed | Slower coasting gives the melt chamber more time to depressurize. |
| Enable Coasting | ✅ / ❌ | Turns the feature on/off. |
How it works: The slicer calculates the amount of filament that would have been extruded during the last few milliseconds of a segment, then subtracts that volume from the extrusion path. The nozzle still travels the same distance, but the filament flow stops early, letting the pressure drop naturally.
When to use it:
- Small‑detail prints where blobs on the outer wall are highly visible.
- Materials with high melt viscosity (ABS, PETG) that retain pressure longer.
- Models with many short perimeters and frequent re‑starts (e.g., intricate lattice structures).
Key downside: If the coasting volume is set too high, the first few millimeters of a new line may be thin, leading to weak walls or visible seams.
3. What Is Cura Combing?
Combing is a travel‑optimization algorithm that forces the nozzle to stay within the printed area whenever possible, instead of taking a direct “air‑move” from one island to another. By keeping the nozzle over already‑printed plastic, any ooze that does escape lands on a surface that will be covered later, effectively hiding the defect.
| Parameter | Typical Setting | Effect |
|---|---|---|
| Combing Mode | *All* / *No Skin* / *Not in Skin* | Determines whether the nozzle can travel over the outer skin (visible surface). |
| Avoid Supports | ✅ / ❌ | Prevents the nozzle from crossing support structures, reducing stringing on supports. |
| Travel Avoid Distance | 0 – 5 mm | Adds a clearance buffer around printed parts to avoid accidental collisions. |
How it works: During slicing, Cura builds a “comb” path that follows the contours of the already‑printed geometry. The algorithm prefers longer, curved moves inside the part rather than short, direct jumps across empty space.
When to use it:
- Prints with many separate islands (e.g., multi‑color or multi‑material prints).
- Materials prone to stringing (PLA, TPU) where a tiny filament strand is more noticeable than a tiny blob.
- Models where the outer skin is not critical, allowing the nozzle to travel over non‑visible areas.
Key downside: Over‑use of combing can increase total print time because the travel distance grows. In extreme cases, the nozzle may “wander” for several centimeters, adding heat to the printed part and potentially causing warping.
4. Direct Comparison: Coasting vs Combing
| Aspect | Cura Coasting | Cura Combing |
|---|---|---|
| Primary Goal | Reduce extrusion at the end of a line (pressure‑based). | Reduce travel‑induced ooze by staying over printed surfaces. |
| Typical Benefit | Fewer blobs on perimeters and infill start points. | Fewer strings between islands and on the outer skin. |
| Impact on Print Time | Negligible (same travel distance). | Can increase travel time by 2-5 % on complex parts. |
| Material Suitability | Best for high‑viscosity filaments (ABS, PETG, Nylon). | Best for low‑viscosity filaments (PLA, TPU) and multi‑color prints. |
| Risk | Under‑extrusion at line start if set too high. | Longer travel may cause slight overheating of already‑printed layers. |
| Interaction | Works independently of travel path. | Works independently of extrusion pressure. |
| Typical Calibration Effort | Adjust coasting volume in 0.05 mm³ steps. | Toggle combing mode and test “Avoid Supports.” |
Bottom line: Coasting attacks the source of the ooze (pressure), while Combing mitigates its visibility (where the ooze lands). The “cleaner” result depends on your print’s geometry and material.
5. Calibration Workflow – Getting the Best of Both Worlds
Below is a practical, repeatable workflow you can copy into Cura. The steps are organized from “quick win” to “fine‑tune” and include concrete settings you can paste into the Custom tab.
Step 1: Baseline Test
- Load a simple benchmark model (e.g., a 20 mm calibration cube with a thin “stringing test” tower).
- Use your usual profile (no Coasting, Combing = All).
- Print and note:
- Number of visible blobs on the outer walls.
- Length and frequency of strings between towers.
Step 2: Enable Coasting
- Open Settings → Shell → Coasting.
- Set Enable Coasting = ✅.
- Start with Coasting Volume = 0.2 mm³ and Coasting Speed = 100 %.
- Print the same benchmark.
Evaluation:
If blobs disappear but the first perimeter layer looks thin, increase Coasting Volume in 0.05 mm³ increments until the seam is smooth.
If the model shows under‑extrusion, reduce the volume.
Pro tip: For PETG, a coasting volume of 0.35 mm³ is often ideal, while PLA usually needs 0.15 mm³ (see Ultimaker’s official documentation for material‑specific recommendations here).
Step 3: Activate Combing
- Go to Settings → Travel → Combing Mode.
- Choose Not in Skin (prevents travel over the visible outer surface).
- Enable Avoid Supports if you use support structures.
- Print again.
Evaluation:
- Count the number of strings. If they drop dramatically, you’ve found a win.
- If travel time spikes (>5 % increase) and the part shows slight heat‑induced warping, switch to No Skin or revert to All for critical surfaces.
Step 4: Combine Both
- Keep the Coasting settings from Step 2.
- Keep the Combing mode from Step 3.
- Print a real model (e.g., a functional bracket or a decorative figurine).
Result: You should see minimal blobs on the outer walls and few, if any, strings between islands.
Step 5: Fine‑Tune with Advanced Options
| Advanced Setting | Recommended Adjustment | Why |
|---|---|---|
| Coasting Speed | 80 % – 90 % of print speed | Slower coasting gives the melt chamber extra time to depressurize, smoothing the start of the next line. |
| Travel Avoid Distance | 0.5 mm – 1 mm | Adds a safety buffer to prevent the nozzle from grazing previously printed features. |
| Minimum Travel Distance | 0.5 mm | Prevents tiny “jiggle” moves that can cause micro‑stringing. |
| Z Hop When Retracted | 0.2 mm (if using high‑speed travel) | Lifts the nozzle during long travels, reducing the chance of dragging filament across the part. |
6. Real‑World Example – PLA Miniature Print
Model: 30 mm fantasy figurine with multiple overhangs and a tiny base.
| Setting | Value |
|---|---|
| Layer Height | 0.12 mm |
| Print Speed | 45 mm/s |
| Coasting Volume | 0.18 mm³ |
| Coasting Speed | 85 % |
| Combing Mode | Not in Skin |
| Avoid Supports | ✅ |
| Travel Avoid Distance | 0.8 mm |
| Z Hop | 0.2 mm |
Outcome: The figurine emerged with a flawless skin—no visible blobs on the torso, and the delicate sword blade showed no stray strings. Print time increased by only 3 % compared with the baseline, a worthwhile trade‑off for the visual improvement.
7. How Coasting and Combing Interact
Although Coasting and Combing operate on different aspects of the print process, they can conflict if not balanced:
- Too much coasting creates a thin start of a line that may be covered by a later combing move, but if the combing path never passes over that spot, the seam remains visible.
- Aggressive combing can force the nozzle to travel over freshly printed perimeters, re‑heating them and potentially re‑melting the coasting‑induced seam, leading to a “smudged” appearance.
Best practice: After you have a satisfactory coasting volume, run a quick combing test with Combing Mode = All. If the outer skin still looks clean, you can safely switch back to Not in Skin for the final print. This two‑step verification ensures both features complement rather than sabotage each other.
This closed‑loop system reduces human error and converges on the optimal settings in just a few iterations. For a deeper dive into n8n‑Cura integration, check out our guide on Enable Z‑Hop in Cura – a step‑by‑step guide.
9. Frequently Asked Questions
Q1. Can I use Coasting with a Bowden extruder?
Yes, but Bowden tubes add extra lag in filament pressure. Start with a lower coasting volume (0.1 mm³) and increase gradually.
Q2. Does Combing affect support removal?
If you enable Avoid Supports, the nozzle will not travel over support structures, reducing the chance of pulling on them. This makes support removal cleaner.
Q3. Should I disable both for high‑speed prints?
High‑speed prints (>120 mm/s) often benefit from Coasting (to counteract pressure spikes) while Combing may be left on All to keep travel short. Test both configurations and compare.
Q4. How do I know the ideal Coasting Volume for a new filament brand?
Print a 20 mm cube with the default profile, then increase Coasting Volume in 0.05 mm³ steps until blobs disappear without creating gaps. Document the value for future builds.
Q5. Does Coasting increase the risk of under‑extrusion on the first layer?
Only if the coasting volume is set too high. Keep the first layer speed low (20–30 mm/s) and monitor the seam; adjust as needed.
10. Quick Reference Cheat Sheet
| Setting | Recommended Starting Value | Adjustment Tips |
|---|---|---|
| Coasting Volume | 0.15 mm³ (PLA) / 0.35 mm³ (PETG) | +0.05 mm³ if blobs persist; –0.05 mm³ if seams thin. |
| Coasting Speed | 100 % | Reduce to 80–90 % for smoother starts. |
| Combing Mode | Not in Skin | Switch to All if outer skin must be flawless. |
| Avoid Supports | ✅ (if using supports) | Disable only for very dense support structures. |
| Travel Avoid Distance | 0.8 mm | Increase for tall prints to avoid collisions. |
| Z Hop | 0.2 mm (optional) | Enable for high‑speed travel >80 mm/s. |
11. Connecting the Dots – More Cura Resources
- Perfect First Layer in Cura – a solid foundation reduces the need for aggressive Coasting.
- Cura Speed‑Quality Profiles – learn how travel speed interacts with Coasting.
These articles dive deeper into related settings that complement Coasting and Combing, giving you a holistic approach to print quality.
12. Take Action Today
Ready to eliminate those pesky blobs and strings? Follow the calibration workflow above, experiment with the cheat sheet, and watch your prints transform.
- Explore more guides: Visit our homepage at https://curaslicers.com for a library of Cura tutorials.
- Stay updated: Follow CuraSlicers on Twitter, Instagram, and LinkedIn for weekly tips.
- Never miss a guide: Subscribe to our newsletter and get the latest slicing tricks delivered straight to your inbox.
Your next flawless print is just a setting away—start tweaking now!