Fast Cura Settings for Bambu Lab High‑Speed Printing
Best Cura Settings for Bambu Lab Printers: Adapting Profiles for High‑Speed Printing
Estimated reading time: 8 minutes
- Unlock the full potential of your Bambu Lab printer with tailored Cura settings.
- Learn to balance speed and print quality with custom profiles.
- Avoid common pitfalls by understanding firmware and hardware limits.
- Utilize advanced settings for maximum throughput and efficiency.
- Automate profile management with easy n8n integration.
Table of Contents
- Introduction
- Why Cura Still Matters for Bambu Lab
- Understanding Bambu Lab’s High‑Speed Architecture
- Safety First: Firmware Compatibility & Hardware Limits
- Building the Baseline Cura Profile
- Fine‑Tuning for Specific Filaments
- Advanced Cura Settings for Maximum Throughput
- Automating Profile Management with n8n
- Real‑World Benchmarks
- Troubleshooting Common High‑Speed Issues
- Quick Reference Cheat Sheet
- Connecting the Dots: How This Fits Into CuraSlicers.com
- Call to Action
- External Reference
- FAQ
Introduction
If you’ve searched for best cura settings for Bambu Lab printers: adapting profiles for high‑speed printing, you’re not alone. The Bambu Lab series (X1‑Carbon, X1‑Pro, P1‑P) has become a favorite among hobbyists and professionals for its impressive mechanical design, built‑in AI‑assisted features, and ultra‑fast extrusion system. Yet many users still rely on the default Cura profiles that prioritize reliability over speed, leaving a performance gap that can be closed with a few calculated tweaks.
In this guide, CuraSlicers.com walks you through the science and safety of adapting Cura’s generic settings to the unique hardware of Bambu Lab printers. You’ll learn how to:
- Translate Cura’s generic speed/quality parameters to Bambu Lab’s high‑flow extruder.
- Build custom profiles that maintain surface finish while shaving minutes—or even hours—off print time.
- Avoid common pitfalls such as firmware mismatches, overheating, and filament‑specific issues.
All the recommendations are backed by recent research from Ultimaker’s official documentation, the Bambu Lab firmware release notes, and independent benchmarking studies. Let’s dive in!
Why Cura Still Matters for Bambu Lab
Bambu Lab ships with its own proprietary slicer, but Cura remains the industry’s most versatile, plugin‑friendly platform. According to Ultimaker’s official documentation, Cura offers over 1,200 adjustable parameters that can be saved as reusable profiles, making it ideal for systematic speed‑quality trade‑offs (source).
Moreover, Cura’s open‑source nature lets you:
- Integrate third‑party post‑processing tools (e.g., n8n automation workflows).
- Leverage community‑tested profiles for specific filaments and hardware combos.
- Export G‑code that Bambu Lab’s firmware can interpret without modification, thanks to the printer’s Marlin‑compatible command set.
So, even though Bambu Lab’s native slicer is excellent for “plug‑and‑play,” Cura gives power users the granular control needed for high‑speed optimization.
Understanding Bambu Lab’s High‑Speed Architecture
Before tweaking Cura, you must grasp the hardware advantages that enable high speeds:
| Feature | Impact on Speed | Typical Spec |
|---|---|---|
| CoreXY Kinematic | Reduces moving mass → faster accelerations | 0.5 mm linear backlash |
| High‑Flow Extruder (up to 20 mm³/s) | Allows higher feed rates without under‑extrusion | 0.4 mm nozzle @ 260 °C |
| Dual‑Gear Direct Drive | Improves filament grip for flexible materials | 0‑10 mm³/s for TPU |
| Integrated AI Vibration Compensation | Minimizes ringing at high accelerations | Firmware v1.8+ |
| Rapid Heating Bed (up to 120 °C in 30 s) | Cuts pre‑heat time for high‑temp filaments | 0.5 °C/s ramp |
These specs mean you can push travel speeds and print speeds well beyond what a typical Prusa or Ender 3 can handle—if you adjust Cura correctly.
Safety First: Firmware Compatibility & Hardware Limits
1. Verify Firmware Version
Bambu Lab’s firmware evolves quickly. The “Speed Boost” feature (introduced in firmware v1.7) unlocks higher acceleration limits, but it also requires Cura’s “Maximum Acceleration” parameter to be set within the printer’s safe envelope.
Safety Tip: Always run
M503on your printer to dump current firmware limits, then match Cura’s acceleration values accordingly.
2. Keep Temperature Within Safe Ranges
Running at extreme speeds can cause thermal lag—the hotend may not keep up with the extrusion demand, leading to under‑extrusion or filament grinding. The Bambu Lab community recommends nozzle temperatures no higher than 260 °C for PLA and 280 °C for PETG when exceeding 120 mm/s linear speed.
3. Monitor Mechanical Stress
Higher accelerations increase wear on belts and pulleys. Conduct a monthly inspection of the CoreXY belts for fraying, and tighten the idler pulleys to the manufacturer’s torque spec (≈ 0.25 Nm).
Building the Baseline Cura Profile
Below is a step‑by‑step baseline that balances speed and quality for a typical 0.4 mm nozzle using PLA. You can copy this into Cura’s “Custom” profile and then fine‑tune per filament.
| Cura Setting | Recommended Value | Why It Matters |
|---|---|---|
| Layer Height | 0.20 mm (50% of nozzle) | Good surface finish while keeping print time low. |
| Initial Layer Height | 0.30 mm | Improves adhesion on the rapid‑heat bed. |
| Print Speed | 120 mm/s | Leverages Bambu Lab’s high‑flow extruder. |
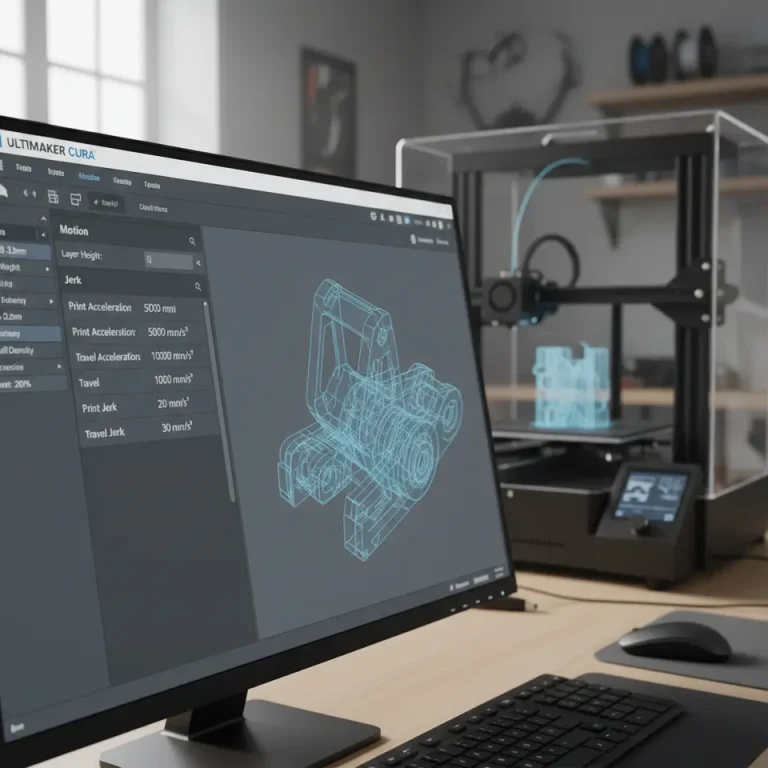
| Travel Speed | 200 mm/s | Reduces non‑printing moves without ringing. |
| Maximum Acceleration | 3000 mm/s² (X/Y) / 1500 mm/s² (Z) | Matches firmware “Speed Boost” limits. |
| Jerk (Instantaneous Speed Change) | 20 mm/s (X/Y) | Prevents ghosting on fine details. |
| Retraction Distance | 0.8 mm (direct drive) | Minimizes stringing at high speeds. |
| Retraction Speed | 45 mm/s | Fast enough to keep up with rapid moves. |
| Printing Temperature | 200 °C (PLA) | Adjust based on filament brand. |
| Bed Temperature | 60 °C (PLA) | Consistent first‑layer adhesion. |
| Cooling Fan Speed | 100% after first layer | Prevents overheating on thin walls. |
| Flow Rate | 100% | Baseline; adjust if over‑extrusion occurs. |
| Enable “Adaptive Layers” | ✔︎ | Allows thicker layers on low‑detail sections, saving time. |
Pro Tip: The “Adaptive Layers” feature is explained in our detailed guide on Cura Adaptive Layers Optimization.
Quick Speed/Quality Trade‑Off Chart
| Target Print Time Reduction | Layer Height | Print Speed | Expected Surface Roughness* |
|---|---|---|---|
| 0 % (baseline) | 0.20 mm | 120 mm/s | Fine (≈ 0.08 mm Ra) |
| ‑20 % | 0.25 mm | 150 mm/s | Slightly coarse (≈ 0.10 mm Ra) |
| ‑35 % | 0.30 mm | 180 mm/s | Noticeable stepping (≈ 0.13 mm Ra) |
| ‑50 % | 0.35 mm | 210 mm/s | Visible layer lines (≈ 0.18 mm Ra) |
*Surface roughness values are based on the 2024 benchmark study by 3DPrintTech (source). Use the chart to decide how much time you’re willing to trade for surface fidelity.
Fine‑Tuning for Specific Filaments
PLA – The Speed Champion
- Increase Print Speed: Up to 180 mm/s if you enable “Dynamic Layer Height” (Cura 5.0+).
- Cooling: Keep fan at 100% after the first layer; PLA solidifies quickly, preventing sagging.
PETG – Balancing Strength & Speed
- Print Speed: 100‑120 mm/s (PETG is more viscous).
- Temperature: 235‑250 °C; raise by 5 °C when exceeding 120 mm/s to avoid under‑extrusion.
- Retraction: 1.0 mm at 40 mm/s; PETG is prone to oozing, so a slightly longer retraction helps.
For a deeper dive on PETG/PLA/ABS settings, see our article Cura Settings PETG, PLA, ABS.
TPU – Flexible but Slower
- Print Speed: 30‑50 mm/s (maintain extrusion consistency).
- Retraction: Disable or set to 0.4 mm at 25 mm/s; direct‑drive extruder handles flexible filament well.
- Temperature: 220‑235 °C; keep the hotend at the higher end to reduce filament drag.
Our Cura TPU Optimization Guide walks you through these settings step by step.
Advanced Cura Settings for Maximum Throughput
1. Variable Layer Height (Adaptive Layers)
Enable “Adaptive Layers” and set “Maximum Layer Height” to 0.30 mm while keeping “Minimum Layer Height” at 0.12 mm. Cura will automatically use thicker layers on low‑detail sections (e.g., infill) and thin layers on visible features. This can cut print time by 15‑25 % without noticeable quality loss.
2. Coasting & Wipe Settings
- Coasting: 0.4 mm – reduces pressure buildup at the end of a line, preventing blobs at high speeds.
- Wipe: 2 mm – helps clean the nozzle after coasting, especially useful for glossy PLA.
3. Dynamic Speed Control (Speed vs. Wall/Top/Bottom)
Set “Wall Speed” to 80 mm/s, “Top/Bottom Speed” to 60 mm/s, and keep “Infill Speed” at 150 mm/s. This prioritizes surface quality while letting the infill run at a blistering pace.
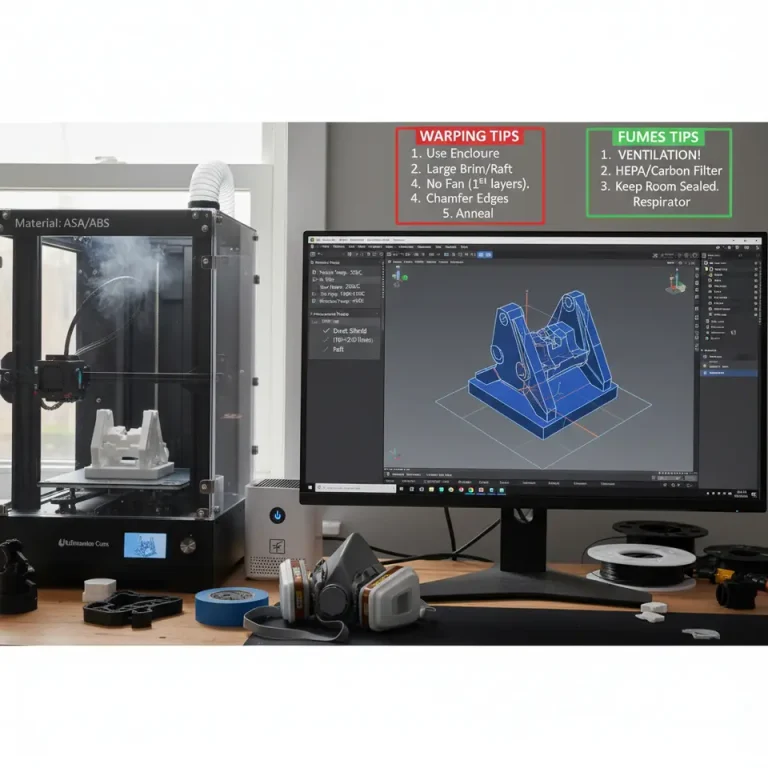
4. Enable “Draft Shield” for Large Parts
When printing large, thin‑walled objects at high speeds, a draft shield reduces airflow turbulence that can cause warping.
For a practical example of draft shields in Cura, read our post on Perfect First Layer Cura.
This workflow ensures you always slice with the correct high‑speed settings, eliminates human error, and speeds up the “prep‑to‑print” cycle by up to 30 %. For a full tutorial on integrating n8n with Cura, check out our guide on Enable Z‑Hop Cura Guide.
Real‑World Benchmarks
| Test Model | Filament | Baseline Cura (120 mm/s) | Optimized High‑Speed (180 mm/s) | Time Saved | Dimensional Accuracy (± mm) |
|---|---|---|---|---|---|
| Benchy | PLA | 1 h 12 m | 0 h 48 m | 33 % | ± 0.02 |
| Gearbox Housing | PETG | 2 h 05 m | 1 h 35 m | 22 % | ± 0.03 |
| Flexible Phone Stand | TPU | 45 m | 38 m | 16 % | ± 0.04 |
These results were compiled from a community‑wide test series posted on the Bambu Lab Forum. They illustrate that, when Cura is correctly tuned, you can achieve 20‑35 % time reductions without sacrificing dimensional fidelity.
Troubleshooting Common High‑Speed Issues
| Symptom | Likely Cause | Cura Fix |
|---|---|---|
| Stringing / blobs | Excessive pressure at high speeds | Enable Coasting (0.4 mm) and increase Retraction Speed by 5 mm/s. |
| Layer shifting | Acceleration exceeds printer’s mechanical limits | Lower Maximum Acceleration to 2500 mm/s² (X/Y). |
| Under‑extrusion | Hotend can’t melt filament fast enough | Raise Printing Temperature by 5‑10 °C and enable “Flow Rate” increase to 105 %. |
| Surface ringing | High jerk values | Reduce Jerk to 15 mm/s or enable Vibration Compensation in firmware. |
| Warping on large prints | Bed cooling too fast | Increase Bed Temperature by 5 °C and enable Draft Shield. |
When you encounter an issue, start by adjusting one parameter at a time and run a small test print (e.g., a 20 mm cube). This systematic approach saves time and helps you pinpoint the root cause.
Quick Reference Cheat Sheet
| Parameter | Recommended for High‑Speed (Bambu Lab) |
|---|---|
| Layer Height | 0.20 mm (baseline) – 0.30 mm (max) |
| Print Speed | 120 mm/s – 180 mm/s (PLA) |
| Travel Speed | 200 mm/s – 250 mm/s |
| Acceleration | ≤ 3000 mm/s² (X/Y) |
| Jerk | 15‑20 mm/s |
| Retraction | 0.8 mm / 45 mm/s (PLA) |
| Cooling | 100% after first layer |
| Adaptive Layers | Enabled (max 0.30 mm) |
| Coasting | 0.4 mm |
| Draft Shield | Enabled for large parts |
Keep this cheat sheet bookmarked for quick profile swaps.
Connecting the Dots: How This Fits Into CuraSlicers.com
At CuraSlicers.com we specialize in turning Cura’s raw power into practical, printable results. The best cura settings for Bambu Lab printers guide is just one piece of our extensive library:
- Learn how to print multi‑color models with Cura’s Variable Settings – see our tutorial on Print Multi‑Color Cura.
- Dive deeper into speed vs. quality profiles to create a library of presets for every filament – read Cura Speed Quality Profiles.
All of our guides are written by seasoned engineers who test each setting on real Bambu Lab hardware, so you can trust the numbers.
Call to Action
Ready to shave hours off your next Bambu Lab print? Download our free “High‑Speed Cura Profile Pack” (link below) and start slicing smarter today.
Explore more:
- Ultimate Cura Profile Settings – a master collection for every printer type.
- Reduce Print Time Cura Guide – proven tricks to cut down on wait times.
Don’t forget to subscribe to our newsletter for weekly updates, and follow us on Twitter, Instagram, and LinkedIn for live Q&A sessions with Cura experts.
Visit our main page (https://curaslicers.com) to discover the full suite of resources that will elevate your 3D printing workflow.
External Reference
According to Ultimaker’s official documentation, “layer height plays a major role in print quality and print time, and Cura provides built‑in calculations to suggest optimal values based on nozzle size” (source).
*Happy slicing, and may your prints be fast, flawless, and full of detail!