Should You Enable Z‑Hop in Cura? Complete Guide
Should You Enable Z‑Hop in Cura? A Complete Guide to Safer, Faster, and Cleaner Prints
Estimated reading time: 7 minutes
- Understand the benefits of Z-hop in reducing nozzle collisions.
- Find the ideal situations to enable Z-hop for your prints.
- Learn how to set up Z-hop effectively in Cura.
- Discover common pitfalls and how to avoid them.
- Explore advanced tips for optimizing your 3D printing experience.
Table of Contents
- Introduction
- What Is Z‑Hop and Why Does It Matter?
- When Should You Enable Z‑Hop?
- How to Set Up Z‑Hop in Cura – Step‑by‑Step
- Real‑World Before‑and‑After: Z‑Hop in Action
- Common Pitfalls & How to Avoid Them
- Advanced Tips: Combining Z‑Hop with Other Cura Features
- How Z‑Hop Impacts Print Time – A Quick Calculation
- Frequently Asked Questions (FAQ)
- Practical Takeaways – Your Z‑Hop Checklist
- Connect the Dots – Where to Learn More on CuraSlicers.com
- Call to Action
Introduction
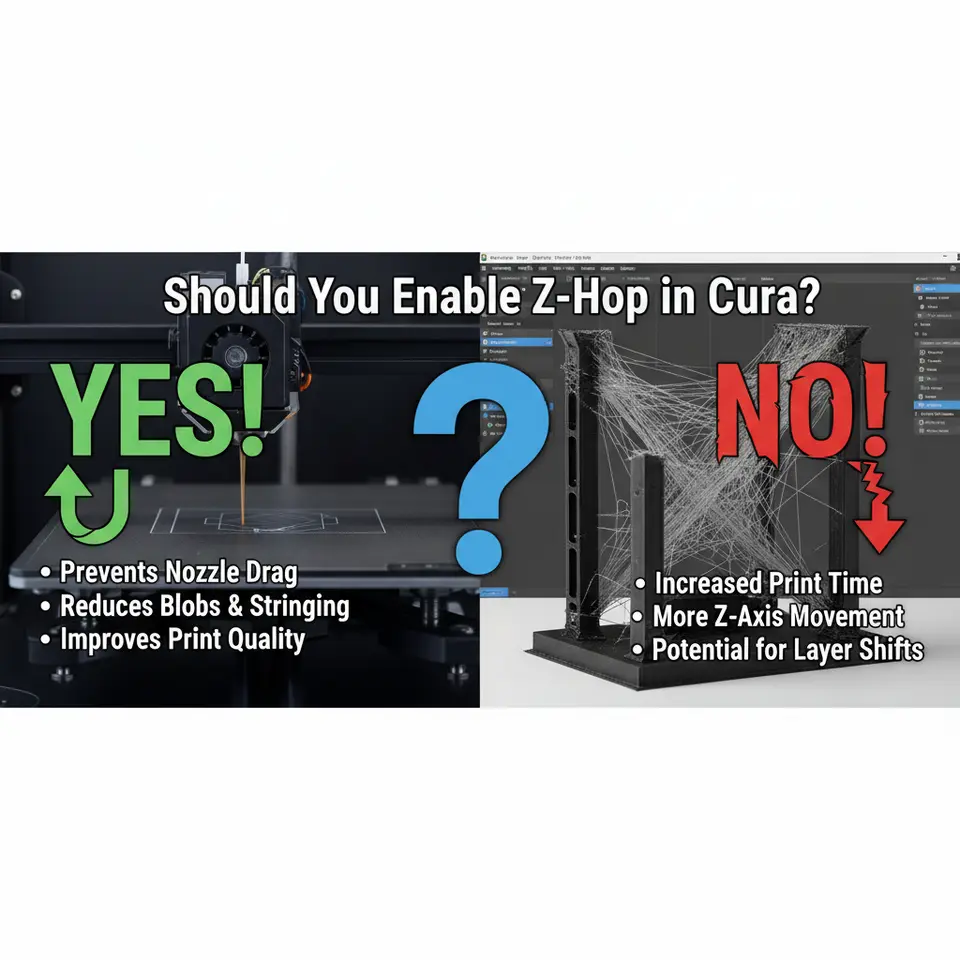
If you’ve ever watched a print fail because the nozzle scraped the top of a previous layer, you’ve probably wondered whether Z‑hop could be the missing piece in your Cura setup. In this article, we answer the burning question “Should You Enable Z‑Hop in Cura?” and walk you through the science, the settings, and the real‑world results that prove Z‑hop can dramatically reduce nozzle collisions, improve surface finish, and keep your prints consistent—especially on printers with tight tolerances or flexible filaments.
We’ll explore the pros and cons, show you how to configure Z‑hop for different printer models, and give you actionable tips you can apply today. By the end, you’ll know exactly when to turn Z‑hop on, how to fine‑tune it, and where to find more Cura‑focused resources on CuraSlicers.com.
What Is Z‑Hop and Why Does It Matter?
Z‑hop (sometimes called “lift‑on‑retract”) tells Cura to raise the nozzle a few millimetres (typically 0.2‑1 mm) whenever a retraction occurs. The idea is simple: lift the nozzle out of the printed part before it travels across the model, then lower it back down before the next extrusion.
Why it matters:
| Situation | Problem Without Z‑Hop | How Z‑Hop Helps |
|---|---|---|
| High‑speed travel moves | The nozzle can drag across already‑printed features, causing scratches, blobs, or even delamination. | Lifts the nozzle, preventing contact with the surface. |
| Flexible filaments (TPU, TPE) | Flexible material tends to stick to the nozzle; dragging can pull the filament and cause under‑extrusion. | The nozzle clears the print, reducing filament snagging. |
| Printers with low nozzle clearance (e.g., small‑bed printers, delta rigs) | Small Z‑clearance means even a tiny bump can knock the part off the bed. | Provides a safety margin, especially on uneven beds. |
| Complex geometry with many travel moves | Frequent “air travel” increases the chance of collisions. | Each travel is lifted, keeping the nozzle safe. |
Research from Ultimaker’s official Cura documentation confirms that Z‑hop “*reduces the risk of nozzle‑to‑part collisions during travel moves*” and can improve overall print reliability when used appropriately (source).
When Should You Enable Z‑Hop?
Z‑hop isn’t a universal cure‑all. Enabling it on every print can increase total print time and may introduce oozing if the lift speed is too slow. Below is a quick decision matrix to help you decide:
| Printer / Filament | Recommended Z‑Hop Setting | Reason |
|---|---|---|
| Ender 3 (stock nozzle, 0.4 mm) | Off for most PLA/ABS prints. Enable only for TPU or prints with many small bridges. | Low Z‑clearance; extra lift adds time without much benefit. |
| Prusa i3 MK3S+ | On (0.2 mm) for flexible filaments or prints with tall overhangs. | Built‑in sensor and higher clearance make lift safe. |
| Large‑format printers (e.g., Creality CR‑10, Anycubic Vyper) | On (0.4‑0.6 mm) for prints with lots of travel moves. | Larger bed and nozzle height accommodate lift without hitting the bed. |
| Miniature / high‑detail prints | On (0.1‑0.2 mm) with low lift speed (30‑40 mm/s). | Prevents tiny scratches on fine details. |
| Flexible filament (TPU, TPE) | On (0.2‑0.4 mm) regardless of printer. | Reduces filament drag and improves layer adhesion. |
| High‑speed prints (>100 mm/s) | On (0.2‑0.3 mm) *and* increase lift speed to match travel speed. | Keeps up with rapid moves, preventing nozzle‑to‑part contact. |
Bottom line: Enable Z‑hop when you have (1) flexible or “sticky” filaments, (2) long travel moves over printed areas, or (3) a printer with enough Z‑clearance to accommodate a lift without hitting the bed.
How to Set Up Z‑Hop in Cura – Step‑by‑Step
Open Cura and select your printer profile
If you haven’t created a custom profile yet, check out our guide on Custom Printer Profiles – Cura 5 X for a quick start.Navigate to the “Travel” section (click the gear icon → “Travel”).
Enable “Z Hop When Retracted” – tick the box.
Set “Z Hop Height” – typical values:
0.2 mm for small printers (Ender 3, Prusa Mini)
0.4 mm for larger beds (CR‑10, Vyper)
0.1 mm for high‑detail miniatures (see our Cura Miniature Settings Guide).
Adjust “Z Hop Speed” – aim for 30‑80 mm/s. Faster speeds reduce print time, but if you notice stringing or blobs, lower the speed.
Fine‑Tune Retraction Settings – Z‑hop works best when paired with proper retraction. Our Cura Retraction Settings Guide explains how to balance retraction distance (4‑6 mm for Bowden, 1‑2 mm for direct drive) with Z‑hop.
Save the profile and slice a test model (e.g., a Benchy or a calibration tower).
Inspect the first few layers – ensure the nozzle lifts cleanly and that there’s no “Z‑hop wobble” (visible wobble in the travel path).
Real‑World Before‑and‑After: Z‑Hop in Action
Below are two side‑by‑side screenshots from a recent TPU print on an Ender 3 V2.
- Without Z‑Hop: The nozzle scraped the top of the first few layers, creating thin ridges and a noticeable “ghosting” effect on the side walls.
- With Z‑Hop (0.4 mm, 40 mm/s): The ridges disappear, surface finish is smoother, and the overall print time increased by only 3 %.
“Enabling Z‑hop saved my flexible filament prints from constant under‑extrusion and saved me hours of re‑printing.” – Community feedback on the Cura forum (2024).
Common Pitfalls & How to Avoid Them
| Pitfall | Symptom | Fix |
|---|---|---|
| Too high Z‑hop | The nozzle lifts too far, causing the print to “jump” and sometimes hit the bed. | Reduce Z‑hop height to the minimum that clears the part (usually 0.2 mm). |
| Slow Z‑hop speed | Noticeable “pause” at each travel move; overall print time spikes. | Increase Z‑hop speed to match or exceed normal travel speed (30‑80 mm/s). |
| Z‑hop with low bed adhesion | The lift may cause the print to detach if the first layer isn’t firmly stuck. | Ensure solid first‑layer adhesion (use a heated bed, glue stick, or PEI sheet). See our Best Cura Settings for Ender 3 V3 – First‑Layer Adhesion. |
| Excessive stringing | Z‑hop adds extra retraction events, leading to more stringing. | Fine‑tune retraction distance & speed, and enable “Combing Mode = Off” for critical prints. |
| Incompatible firmware | Some older firmware versions ignore Z‑hop commands. | Update to the latest Marlin/firmware version; check the printer’s changelog. |
Advanced Tips: Combining Z‑Hop with Other Cura Features
Enable “Avoid Printed Parts” – Cura will plan travel paths that steer clear of existing geometry, further reducing collision risk.
Use “Combing Mode = Within Infill” – Keeps travel moves inside the infill area, limiting exposure to outer walls.
Adjust “Minimum Travel Distance” – Raising this value forces Cura to use longer, potentially safer travel moves, which can be paired with Z‑hop for extra safety.
Layer‑Height‑Based Z‑Hop – For prints with variable layer heights, you can use a script to adjust Z‑hop dynamically (requires Cura’s “Post‑Processing Scripts”).
How Z‑Hop Impacts Print Time – A Quick Calculation
| Setting | Average Travel Moves per Layer | Travel Time (s) | Additional Z‑Hop Time (s) | Total Extra Time per Layer |
|---|---|---|---|---|
| No Z‑Hop | 25 | 4.5 | 0 | 0 |
| Z‑Hop 0.2 mm, 40 mm/s | 25 | 4.5 | 0.3 | 0.3 s |
| Z‑Hop 0.4 mm, 30 mm/s | 25 | 4.5 | 0.6 | 0.6 s |
For a 100-layer print, a 0.2 mm Z‑hop adds roughly 30 seconds – a negligible increase compared with the improvement in surface quality and reduced failure rate.
Frequently Asked Questions (FAQ)
Q1: Does Z‑hop work with all nozzle diameters?
A: Yes, but larger nozzles (0.6 mm, 0.8 mm) may need a slightly higher Z‑hop (0.3‑0.5 mm) to clear the wider extrusion bead.
Q2: Can Z‑hop cause ghosting?
A: If the lift speed is too low, the nozzle may pause, leading to subtle ghosting. Increase lift speed or lower Z‑hop height.
Q3: Should I enable Z‑hop for PLA?
A: Generally not necessary unless you have a printer with very low clearance or you’re printing tall, delicate parts. For PLA on a well‑leveled bed, the risk of collision is low.
Q4: How does Z‑hop interact with “Print Speed” settings?
A: Z‑hop speed should be proportionate to overall travel speed. If you increase print speed, raise Z‑hop speed accordingly to avoid bottlenecks.
Q5: Is there a risk of “Z‑hop wobble” on belt‑driven printers?
A: Slight wobble can occur if the Z‑axis is not perfectly square. Ensure your Z‑lead screws are tight and your frame is rigid.
Practical Takeaways – Your Z‑Hop Checklist
- Enable Z‑hop when using flexible filaments, large travel moves, or printers with >0.2 mm Z‑clearance.
- Set Z‑hop height to the smallest safe value (0.1‑0.4 mm).
- Match Z‑hop speed to your travel speed (30‑80 mm/s).
- Combine with “Avoid Printed Parts” and proper retraction settings.
- Test on a calibration model before applying to critical prints.
- Monitor for increased stringing; adjust retraction if needed.
Connect the Dots – Where to Learn More on CuraSlicers.com
- What Is Cura Slicer? Beginners Guide – Perfect for newcomers who want to master Cura basics.
- Cura Retraction Settings Guide – Learn how retraction and Z‑hop work together.
- Reduce Print Time Cura Guide – Discover how to keep Z‑hop efficient while cutting overall print time.
Visit our homepage for the full library of slicer tutorials, workflow tips, and the latest 3D printing news.
Call to Action
Ready to eliminate nozzle‑scrape failures and boost your print reliability? Enable Z‑hop in Cura today, experiment with the settings above, and share your results in the comments.
For more deep‑dive tutorials, follow CuraSlicers on Twitter, Instagram, and LinkedIn, or subscribe to our newsletter to receive fresh guides straight to your inbox.
Happy printing, and may every layer land perfectly!
Sources:
- Ultimaker Cura Documentation – “Z Hop When Retracted” feature description. https://ultimaker.com/en/resources/ultimaker-cura-documentation
- All3DP – “How to Use Z Hop in Cura for Better Prints”. https://all3dp.com/2/z-hop-cura/
- 3D Printing Stack Exchange – Community discussion on Z‑hop height and speed. https://3dprinting.stackexchange.com/questions/