Advanced Seam Placement and Hiding Techniques in Cura
Cura Slicer Advanced Seam Placement and Seam Hiding Techniques
Estimated reading time: 5 minutes
- Seam management significantly improves print aesthetics.
- Utilizing coasting and wiping can help minimize seams.
- Micro-adjustments like shell overlap are key for a polished look.
- Experiment with seam algorithms for different models.
- Learn about techniques that can enhance 3D print quality.
Table of Contents
- Understanding Seam Algorithms and Seam Position Settings
- Utilizing Coasting and Wiping to Hide Seams
- Micro-Adjustments for Enhanced Cosmetical Results
- Conclusion: Mastering Seam Techniques
- FAQ
Understanding Seam Algorithms and Seam Position Settings
What Are Seams?
Seams in 3D printing are the edges that form when a print head starts and stops printing a layer. They can lead to noticeable lines and blemishes on the surface of your printed object, especially in areas where the print is meant to look smooth or uniform.
Types of Seam Placement
Ultimaker Cura offers several seam placement strategies:
- User-Defined: You manually adjust the seam position.
- Random: The seam is placed randomly, which can help to minimize visibility.
- Aligned: Seams are aligned to the back of the model to hide them as much as possible.
- Minimum Length: Ideal for complex models, this strategy places seams in the least visible positions.
Adjusting Seam Settings: To change these settings, go to the “Shell” section in Cura. Each option has its pros and cons, and the best choice often depends on the specific design you are working on.
According to Ultimaker’s documentation on layer height and print quality, seam position plays a significant role in the overall aesthetics of the model.
Utilizing Coasting and Wiping to Hide Seams
What is Coasting?
Coasting is a feature within Cura that allows the printer to stop extruding filament slightly before finishing a line segment. This helps reduce excess filament and can minimize the appearance of seams by preventing oozing.
How to Enable Coasting in Cura:
- Navigate to the “Material” settings in Cura.
- Look for the “Coasting” parameter and set it to an appropriate value. Typically, this can be between 0.5 to 2.5 mm, but testing is key.
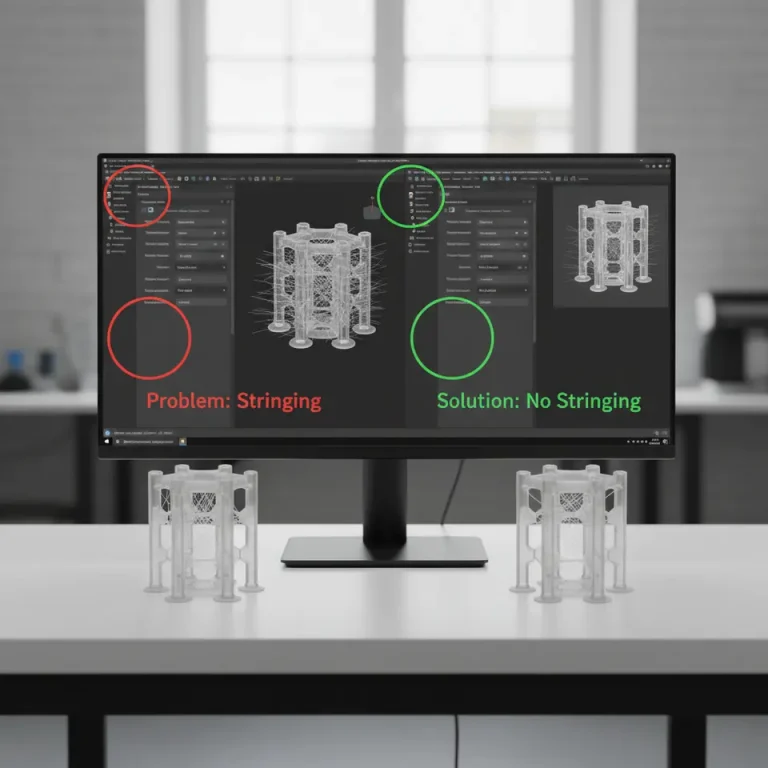
What is Wiping?
Wiping involves the print head moving over areas where it’s already printed without extruding filament. This technique is excellent for preventing stringing and can help hide seams as well.
Enabling Wiping:
- In the “Travel” settings, ensure that “Wipe” is enabled.
- Adjust the wipe distance if necessary, typically between 5 to 10 mm.
Practical Tip
Test various coasting and wiping distances to find the sweet spot that best suits your printer and filament type. A smaller nozzle diameter and higher printing speed may require different settings compared to a larger nozzle or lower speed.
Micro-Adjustments for Enhanced Cosmetical Results
Improving seam appearance often requires micro-adjustments to specific settings:
Shell Overlap
Shell overlap is the distance that the inner walls of the model overlap with the outer shell walls. Increasing the overlap can help blend seams better.
- In Cura, go to the “Shell” settings.
- Look for “Wall Overlaps” and try increasing it by small increments (1-3 mm).
Start-Point Alignment
Aligning the starting point of the layer can also help minimize visible seams. To adjust this:
- Navigate to “Shell” and find “Start Point.”
- Experiment with different positions until you achieve a more seamless appearance.
Sample Adjustments
- Increase shell overlap: Begin with 3 mm and adjust based on your print quality.
- Adjust start-point alignment: Shift the start point to the back or bottom of the design where it will be less visible.
Visual Examples
To illustrate these techniques, let’s look at some comparative examples of prints with and without adjustments. Below are images of a model showing:
- Original seam placement
- After enabling coasting
- After adjustments to shell overlap and start-point alignment
*images would be inserted here*
Conclusion: Mastering Seam Techniques
By leveraging the advanced seam placement and hiding techniques available in Cura, you can significantly enhance the cosmetic quality of your 3D prints. Experimenting with seam algorithms, coasting, wiping, and micro-adjustments can create a more polished, professional finish.
Take the time to adjust these settings according to your specific model and printer capabilities, and you’ll soon notice a dramatic improvement.
Explore More: For further tips on optimizing your prints, check out our articles on Best Cura Settings for Ender 3 and Cura Speed and Quality Profiles.
Have questions or want to share your own tips? Join the conversation and connect with us on social media or subscribe to our blog for future guides!
| Visit CuraSlicers.com for more insights on 3D printing technology. |
FAQ
Q: What is the best seam placement option?
A: The best option depends on the specific model, but many users find “Minimum Length” effective for complex designs.
Q: How can I reduce stringing in my prints?
A: Enable wiping in your Cura settings and consider coasting to reduce excess filament.
Q: Are there typical settings for shell overlap?
A: A starting point of 3 mm is recommended, with adjustments based on print quality.
Q: How does start-point alignment affect seams?
A: Proper alignment can minimize the visibility of seams by positioning them in less noticeable areas.