Fixing Cura Slicer: Resolving Prints Sticking to Nozzle
Cura Slicer Troubleshooting: Why My Print Sticks to the Nozzle and How to Fix It
Estimated reading time: 5 minutes
- Understand the causes: Discover why your prints may stick to the nozzle.
- Step-by-step solutions: Learn how to troubleshoot and fix sticking issues.
- Preventative settings: Discover Cura settings that can reduce sticking problems.
- Regular maintenance: Importance of cleaning your nozzle for better prints.
Table of Contents
- Understanding Why Prints Stick to the Nozzle
- Step-by-Step Fixes for Sticking Prints
- Preventative Cura Settings
- Additional Skills for 3D Printing Troubleshooting
- Conclusion
- FAQ
Understanding Why Prints Stick to the Nozzle
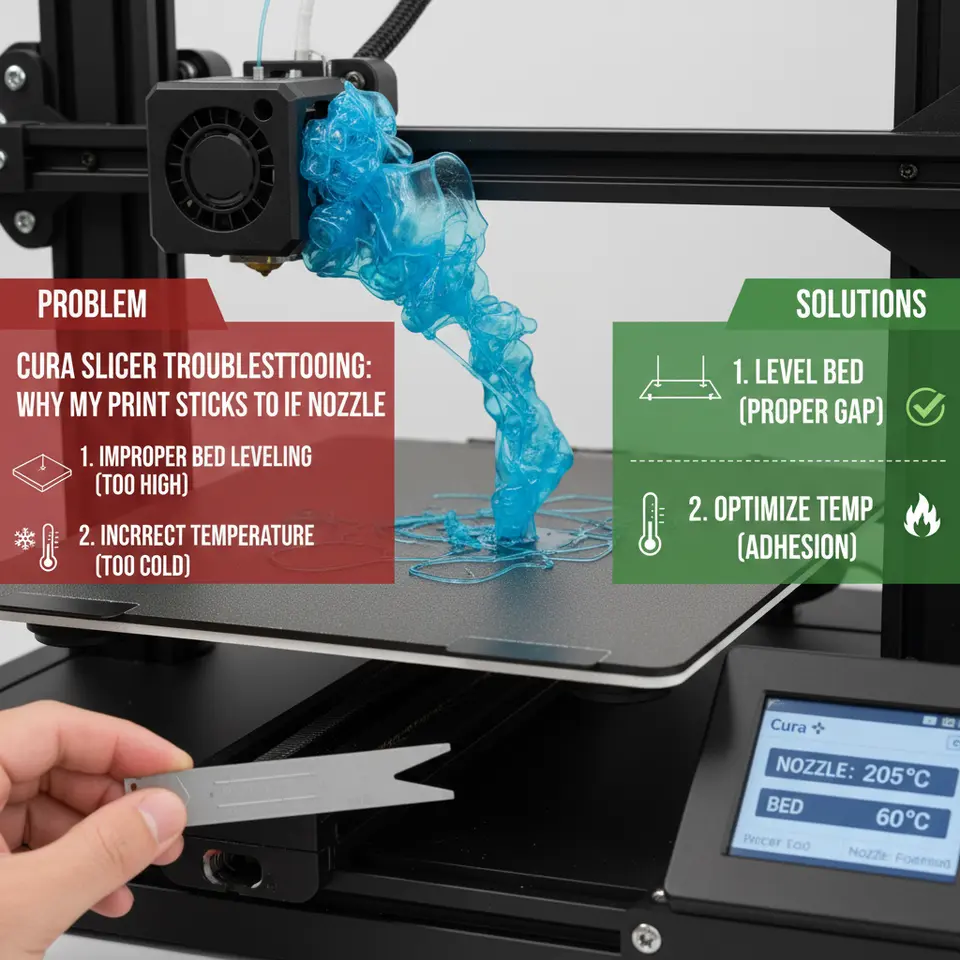
Prints sticking to the nozzle can result from various factors, and when you’re using Ultimaker Cura as your slicer, adjusting certain settings can either help prevent or resolve this issue. Let’s examine some common causes:
1. Bed Too Close to the Nozzle
If the print bed is positioned too close to the nozzle, it can create issues such as excessive filament squishing against the nozzle. This squished filament can bake onto the nozzle, leading to the print sticking.
Solution: Adjust the Z-axis offset to increase the distance between the nozzle and the print bed. You can refer to our guide on Perfect First Layer in Cura for detailed instructions on how to calibrate the bed correctly.
2. Excess Oozing
Oozing occurs when the nozzle leaks filament during non-printing movements, which can result in blobs of hot plastic forming on the nozzle. These blobs can then transfer to the print.
Solution: To address oozing, you should activate the Z Hop setting, which lifts the nozzle during travel moves. Check out our guide on Enabling Z Hop in Cura to learn how to implement this feature.
3. High Temperatures
Using a temperature that is too high for the filament being printed can cause the material to become overly fluid, leading to drips and strings that accumulate on the nozzle.
Solution: Ensure you’re using the recommended temperature settings for your filament. Check out our article on Cura Temperature Profiles for specific temperature settings based on the filament type.
4. Incorrect Retraction Settings
If your retraction settings are not adequately configured, they can lead to filament oozing out of the nozzle during travel moves, which can contribute to sticking.
Solution: Adjust your retraction settings to find the sweet spot for your materials. Consult our Cura Retraction Settings Guide for optimization tips.
5. Dirty Nozzle
Accumulated filament residue on the nozzle can also cause new prints to stick. Regular cleaning is essential to maintain print quality.
Solution: Clean the nozzle regularly with a brass brush or a specialized nozzle-cleaning tool.
Step-by-Step Fixes for Sticking Prints
Here’s a step-by-step approach to troubleshooting the issue of prints sticking to the nozzle:
Step 1: Identify the Issue
Run a thermal and extrusion test to isolate the specific issue you’re encountering. Print a small calibration object to monitor the behavior of the filament and the nozzle.
Step 2: Verify and Adjust Bed Leveling
Check your bed leveling. If the bed is too low, adjust the bed height carefully, ensuring it is level across the entire build plate. Re-calibrate if necessary.
Step 3: Check and Modify Temperature Settings
Perform tests at various temperature settings. If the print consistently sticks, lower the temperature in increments of 5–10 degrees Celsius until you find an optimal setting with no sticking.
Step 4: Modify Retraction Settings
Adjust your retraction distance and speed. A good starting point for most filaments is a distance of 4-6 mm and a speed of 30-40 mm/s.
Step 5: Clean the Nozzle
Before printing, ensure the nozzle is clean. If it has any buildup, carefully clean it using appropriate tools.
Preventative Cura Settings
To help prevent prints from sticking to the nozzle in the first place, here are some ideal Cura settings you should consider:
- Z Hop When Retracted: Enable this setting to lift the nozzle during travel moves, reducing the risk of oozing filament sticking to the nozzle.
- Adjust Print Speed: Slower speeds during layers can help reduce oozing.
- Activate Combing Mode: Under the ‘Travel’ settings, activating ‘Combing Mode’ can assist in reducing oozing by keeping the nozzle within the printed part as much as possible during travel moves.
- Use Support When Necessary: Sometimes, adding proper support can help prevent issues related to bad adhesion during the initial layers.
By keeping your Cura settings optimized and adjusted to your specific context, you can significantly enhance your 3D printing experience.
Additional Skills for 3D Printing Troubleshooting
Having knowledge of troubleshooting techniques not only streamlines your printing projects but also empowers you to optimize future prints more effectively. It is important to stay informed and continuously experiment with your Cura settings. Alongside troubleshooting nozzle issues, also consider reading our detailed article on Cura Speed vs. Quality Profiles to discover more about balancing these two essential aspects of 3D printing.
Conclusion
Print sticking to the nozzle can be an exasperating issue, but with an understanding of the causes and the application of appropriate Cura settings, it is a problem that can often be remedied. With the right tips and continued experimentation, you can produce remarkable prints consistently.
For more 3D printing tips, troubleshooting advice, and expert Cura settings, make sure to visit CuraSlicers.com regularly. Consider following us on social media for the latest updates and subscribing to our newsletter to ensure you never miss out on a guide or tutorial.
Would you like to dive deeper into specific Cura features? Check out our article on the hidden features of Cura for advanced tips and tricks!
Outbound Link: For more information regarding your Cura settings, visit Ultimaker’s official documentation on Cura here Ultimaker Cura documentation.
FAQ
How can I fix a print sticking to the nozzle?
Adjust your Z-axis offset, clean the nozzle, and modify your temperature and retraction settings.
What causes oozing in 3D printing?
Oozing can occur due to high temperatures, incorrect retraction settings, or excessive filament pressure on the nozzle.
How often should I clean my nozzle?
It’s recommended to clean the nozzle regularly, especially if you notice prints sticking or poor extrusion quality.