Master Cura Slicer for Multi-Part Assemblies
Mastering Cura Slicer for Multi-Part Assemblies: Alignment, Tolerances, and Printing Fit-and-Snap Connectors
Estimated reading time: 6 minutes
- Understanding and applying tolerances for better fit-and-snap designs
- Key Cura slicer settings that impact assembly quality
- Importance of prototyping and testing your parts
- Actionable tips for successful multi-part assemblies
- Additional resources for enhancing 3D printing knowledge
Table of Contents
- Understanding Tolerances in Multi-Part Assemblies
- Utilizing Cura Slicer Settings for Optimal Assembly
- Creating Fit-and-Snap Connectors
- Calibration and Testing
- Practical Takeaways
- Additional Resources
- Conclusion and Call to Action
Understanding Tolerances in Multi-Part Assemblies
Before diving into Cura slicer settings and practices, it’s crucial to understand what tolerances are and why they are vital for your projects.
What are Tolerances?
Tolerances refer to the allowable gaps or variances in the dimensions of parts that will be assembled together. In 3D printing, these measurements are critical because slight variations can lead to parts not fitting properly or not functioning effectively. For instance, if two connector parts need to snap together, their tolerances must account for both material shrinkage and layer adhesion characteristics.
Common Tolerances for Fit-and-Snap Connectors
| Material | Recommended Tolerance (mm) |
|---|---|
| PLA | 0.2 – 0.5 |
| ABS | 0.3 – 0.7 |
| PETG | 0.2 – 0.4 |
| TPU | 0.5 – 1.0 |
Designing Your Parts with Tolerances in Mind
- Use CAD Software: When designing your parts, make sure to incorporate the recommended tolerances directly into your designs.
- Test Fit: Always prototype and test the fitting of your connectors before a full-scale print. This practice can save material and time.
Utilizing Cura Slicer Settings for Optimal Assembly
With a grasp on tolerances, the next step is configuring your Cura slicer settings to execute those designs accurately. Below are a few key settings that will impact the assembly of your multi-part models.
1. Layer Height
Layer height can influence the surface quality and dimensional accuracy of your prints. A smaller layer height will enhance detail, crucial for parts that require precision. For fit-and-snap connectors, use a layer height of 0.1mm to 0.2mm for increased accuracy.
2. Print Speed
Faster print speeds can sometimes lead to inaccuracies. To achieve reliable parts, consider reducing the print speed to 40-50mm/s, especially for intricate sections where alignment matters.
3. Wall Thickness and Infill
Increase the wall thickness (at least 2-3 walls) to add sturdiness to the connectors. If your connectors are under stress when fitting, a higher infill percentage (around 40-60%) could provide the needed strength.
4. Temperature Settings
Adjust the nozzle temperature according to the material you are using:
- PLA: 200-220°C
- ABS: 230-250°C
- PETG: 230-250°C
- TPU: 210-230°C
Ensure that the bed temperature is also adjusted accordingly, as it helps with adhesion and reducing warping.
5. Advanced Settings
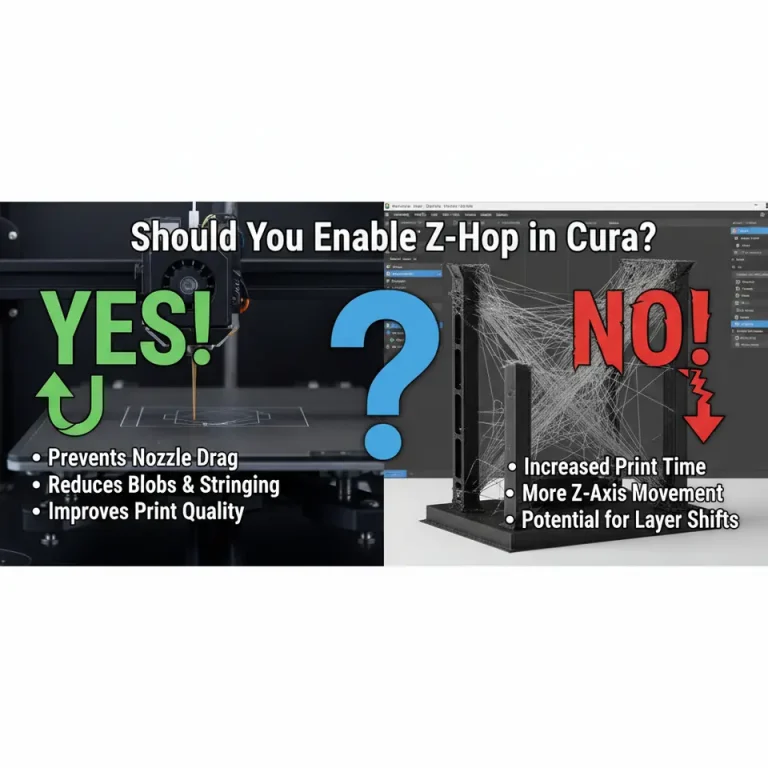
Explore features such as Z-Hop and Adaptive Layer Heights. Z-Hop can prevent rubbing against your already printed parts, while Adaptive Layer Heights can optimize height based on geometry complexity, improving surface details without substantial print time increases (check out our guide on Enable Z-Hop in Cura).
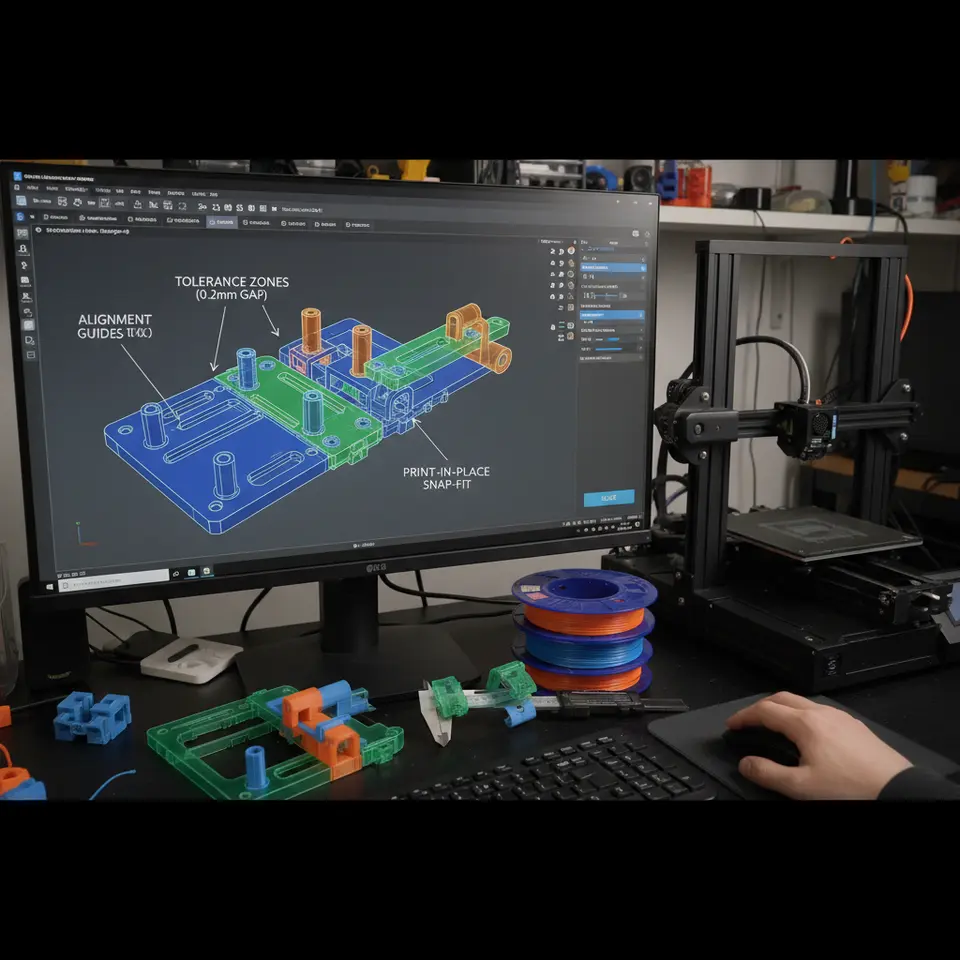
Creating Fit-and-Snap Connectors
When creating connectors that should fit and snap together, follow these guidelines:
- Connector Design: Ensure the design includes a ‘bulb’ or ‘lip’ that mates with a cavity or a socket on the counterpart part.
- Check Orientation: Be mindful of the orientation when printing parts; optimizing orientations can directly affect tolerances and inter-part interaction.
- Test Print: Include a small test print of your connector system and modify based on the fit before final production. For a more scientific approach, a printable tolerance test kit is available for download to aid in the calibration process (consider creating your own STL for the community).
Calibration and Testing
Once you’ve set your print parameters and designed your parts, it’s time to test them. Here’s a simple workflow to calibrate and test your outputs:
- Print a Calibration Model: Use shape blocks of different dimensions based on your tolerance table.
- Check Fit: Assemble different parts and note any points of failure, making adjustments to tolerances as necessary.
- Iterate: Modify your designs based on feedback from your test printed pieces until you achieve the desired results.
Practical Takeaways
Here are a few actionable tips for achieving better assembly results with Cura slicer:
- Always test print your multi-part assemblies before committing to larger production runs.
- Use calibration models to determine the perfect fit before implementing your designs into your projects.
- Regularly recalibrate your printer to ensure the most accurate results.
- Utilize post-processing techniques like sanding or adjusting with files to acquire the perfect fit if necessary.
Additional Resources
For more in-depth guides on CurA’s functionality regarding print quality and slicer settings, check out our articles on Print Multi-Color in Cura and Cura Speed vs. Quality Profiles.
Conclusion and Call to Action
Understanding how to effectively use Cura slicer to navigate multi-part assemblies will significantly enhance your 3D printing capabilities. From planning tolerances to utilizing crucial slicing settings, the success of your prints can be greatly improved.
We invite you to delve deeper into more tutorials on Cura slicer settings and optimization techniques at CuraSlicers.com. If you haven’t already, be sure to subscribe to our newsletter for the latest updates, tips, and community insights!
For credible, comprehensive information on slicer settings, you can refer back to Ultimaker’s official documentation (Ultimaker) and enrich your understanding of what your Cura slicer can do.
Happy printing!
FAQ
- What should I consider for tolerances when designing parts?
- How can I optimize my Cura settings for better fit?
- What is the best material for fit-and-snap connectors?
What should I consider for tolerances when designing parts?
Consider material shrinkage, layer adhesion, and the recommended tolerances for the material you are using.
How can I optimize my Cura settings for better fit?
Adjust layer height, print speed, wall thickness, infill percentage, and temperature settings according to the specific material and part design.
What is the best material for fit-and-snap connectors?
PLA is a common choice due to its ease of use, but ABS and TPU can also be excellent alternatives depending on the application and required flexibility.