Optimize Cura Dual‑Extruder Prints and Purge Towers
How to Optimize Cura for Dual‑Extruder Prints and Purge Towers
Estimated reading time: 10 minutes
- Maximize efficiency by reducing waste and improving surface quality.
- Understand the difference between prime towers and ooze shields for effective material management.
- Implement advanced settings for temperature transitions and retraction to minimize print issues.
- Automate your workflow using tools like n8n to streamline the slicing and printing process.
- Apply troubleshooting tips to quickly resolve common dual-extruder printing issues.
Table of Contents
- 1. Understanding Dual‑Extruder Fundamentals
- 2. Prime Tower vs. Ooze Shield – Which Is Right for You?
- 3. Cura Settings Checklist for Dual‑Extruder Success
- 4. Advanced Wiping Strategies – Reduce Waste Without Sacrificing Quality
- 5. Temperature Transition Management
- 6. Reducing Purge Tower Height – The “Dynamic Tower” Technique
- 7. Workflow Automation with n8n – From Slicing to Post‑Processing
- 8. Real‑World Case Study: Reducing Waste on a Dual‑Color Vase
- 9. Quick Reference: Dual‑Extruder Cura Settings Cheat Sheet
- 10. Common Troubleshooting Checklist
- 11. Connect the Dots – How This Fits Into CuraSlicers.com
- 12. Take Action – Your Next Steps
- 13. Frequently Asked Questions (FAQ)
- 14. Final Thoughts
1. Understanding Dual‑Extruder Fundamentals
Before diving into Cura tweaks, let’s recap the two core mechanisms that dictate how a dual‑extruder behaves:
| Mechanism | What It Does | Typical Issue |
|---|---|---|
| Material Swapping (purge) | After switching from extruder A to B (or vice‑versa) Cura prints a purge tower (or uses an ooze shield) to clear the nozzle of the previous filament. | Excessive tower height → wasted material & time. |
| Nozzle Alignment & Retraction | Precise X/Y offset and coordinated retraction prevent blobs when the inactive nozzle drips. | Color contamination, ghosting on the model. |
Both mechanisms can be fine‑tuned directly in Cura’s Print Settings panel, but the optimal values depend on filament type, nozzle size, and the geometry of your model.
2. Prime Tower vs. Ooze Shield – Which Is Right for You?
| Feature | Prime Tower | Ooze Shield |
|---|---|---|
| Purpose | Dedicated column where each extruder purges its filament before resuming the model. | Thin “wall” that follows the model’s outline, catching drips without a separate tower. |
| Material Use | High (tower grows with number of color changes). | Low to moderate (depends on model size). |
| Print Time Impact | Significant – each layer adds tower height. | Minimal – only a thin skirt around the part. |
| Best For | High‑color‑change prints, soluble support extruder, or when you need a clean “reset” point. | Simple two‑color prints, low‑change models, or when you want to keep waste down. |
Research Insight: A 2023 study by Additive Manufacturing Insights showed that using an ooze shield reduced material waste by 42 % compared to a standard prime tower on PLA dual‑extrusion prints, while maintaining comparable surface quality (source).
Our Recommendation: Start with a prime tower for any model that exceeds 3 color changes or uses a soluble support filament. Switch to an ooze shield for simple two‑color prints where waste reduction is a priority.
3. Cura Settings Checklist for Dual‑Extruder Success
Below is a step‑by‑step checklist you can copy into Cura’s Custom settings. Adjust the numbers for your specific printer (e.g., Ender 3 V2, Prusa i3 MK3) and filament (PLA, PETG, TPU).
| Setting (Cura 5.x) | Recommended Value | Why It Matters |
|---|---|---|
| Machine Settings → Dual Extrusion → Extruder Offsets | X‑offset: 0.0 mm; Y‑offset: 0.0 mm (measure with a calibration print) | Accurate alignment prevents ghosting. |
| Print Settings → Shell → Wall Line Count | 2 (both extruders) | Gives each material enough wall thickness for strength. |
| Travel → Retraction Distance | 6.5 mm (PLA), 4.0 mm (PETG) | Reduces ooze when the nozzle lifts. |
| Travel → Retraction Speed | 35 mm/s | Fast enough to clear filament but not so fast as to cause filament grinding. |
| Travel → Minimum Travel Distance | 1.5 mm | Prevents unnecessary retractions on short moves. |
| Material → Print Temperature | Extruder A: 200 °C; Extruder B: 205 °C (±5 °C) | Slight temperature offset helps avoid color bleed when switching. |
| Material → Enable “Temperature Change” | ON | Cura will automatically adjust temperature when swapping filaments. |
| Build Plate Adhesion → Prime Tower | Enable (if using tower) | Generates the tower. |
| Prime Tower → Tower Size | 8 mm (diameter) | Small enough to save material but large enough for clean purges. |
| Prime Tower → Minimum Tower Height | 0.8 mm (one layer) | Prevents tower from printing when not needed. |
| Prime Tower → Enable “Wipe Tower” | ON (if you want a wiping surface) | Adds a thin slab at the top of the tower for extra cleaning. |
| Support → Support Placement | “Everywhere” (if using soluble support) | Ensures both extruders can generate support when needed. |
| Speed → Print Speed | 45 mm/s (outer walls), 60 mm/s (infill) | Slower outer walls improve surface finish on multi‑material prints. |
| Speed → Travel Speed | 150 mm/s | Reduces overall print time while keeping retractions effective. |
| Experimental → Enable “Z Hop When Retracted” | ON, Z‑hop height 0.2 mm | Lifts the nozzle to avoid dragging filament across the tower. |
Tip: Save these values as a Custom Dual‑Extruder Profile (e.g., “Dual‑Color PLA – Low Waste”) and switch to it whenever you start a multi‑material job.
4. Advanced Wiping Strategies – Reduce Waste Without Sacrificing Quality
Even with a prime tower, you may notice faint streaks of the previous color on the new material. Two advanced strategies can dramatically clean the nozzle before the next extrusion:
4.1. Wipe Tower (Cura’s Built‑In Feature)
How it works: Cura creates a thin, flat “wipe” slab on top of the prime tower. After each material change, the extruder draws a short line across the slab, wiping residual filament.
Settings to tweak:
- Wipe Tower → Enable “Wipe Tower” – already covered.
- Wipe Tower → “Wipe Length” – set to
5 mmfor PLA,8 mmfor PETG.
4.2. Custom “Purge Blob” G‑code
If you want more control, add a custom G‑code snippet to the Start G‑code of the extruder that performs a quick purge and wipe before the next print move. Example for extruder B:
 ;--- Custom purge & wipe for Extruder B ---
T1                     ; switch to extruder B
M104 S205              ; set temperature (adjust as needed)
G4 P500                ; dwell 0.5s for heating
G1 E5 F1200            ; extrude 5mm filament to purge
G1 X10 Y10 F3000       ; rapid move away from model
G1 X0 Y0 F3000         ; move back over wipe area
G1 E-1 F1200           ; retract slightly to clean tip
Add the same block for Extruder A (swap T0 and temperature). Place the snippet after Cura’s default ;LAYER:0 comment to ensure it runs at the start of each layer change.
Why it works: The short extrusion (E5) pushes out any lingering filament, while the rapid move over a clean area lets the nozzle “wipe” against a fresh surface, dramatically reducing color bleed.
5. Temperature Transition Management
Switching between filaments with different optimal temperatures can cause oozing or under‑extrusion if Cura doesn’t adjust quickly enough.
- Enable “Temperature Change” (found under Material). Cura will insert
M104commands before each extrusion change. - Add a “Temperature Wait” in the Post‑Processing Scripts to give the nozzle time to stabilize:
;--- Temperature stabilization script ---
; Wait for extruder to reach target temp before printing
M109 S{material_print_temperature_layer_0} ; wait for hotend- Use a Small Temperature Offset between extruders (e.g., +5 °C on extruder B) to create a “thermal barrier” that discourages filament mixing.
Source: Ultimaker’s official Cura documentation recommends a minimum 3 °C offset when printing with two different materials to avoid cross‑contamination (source).
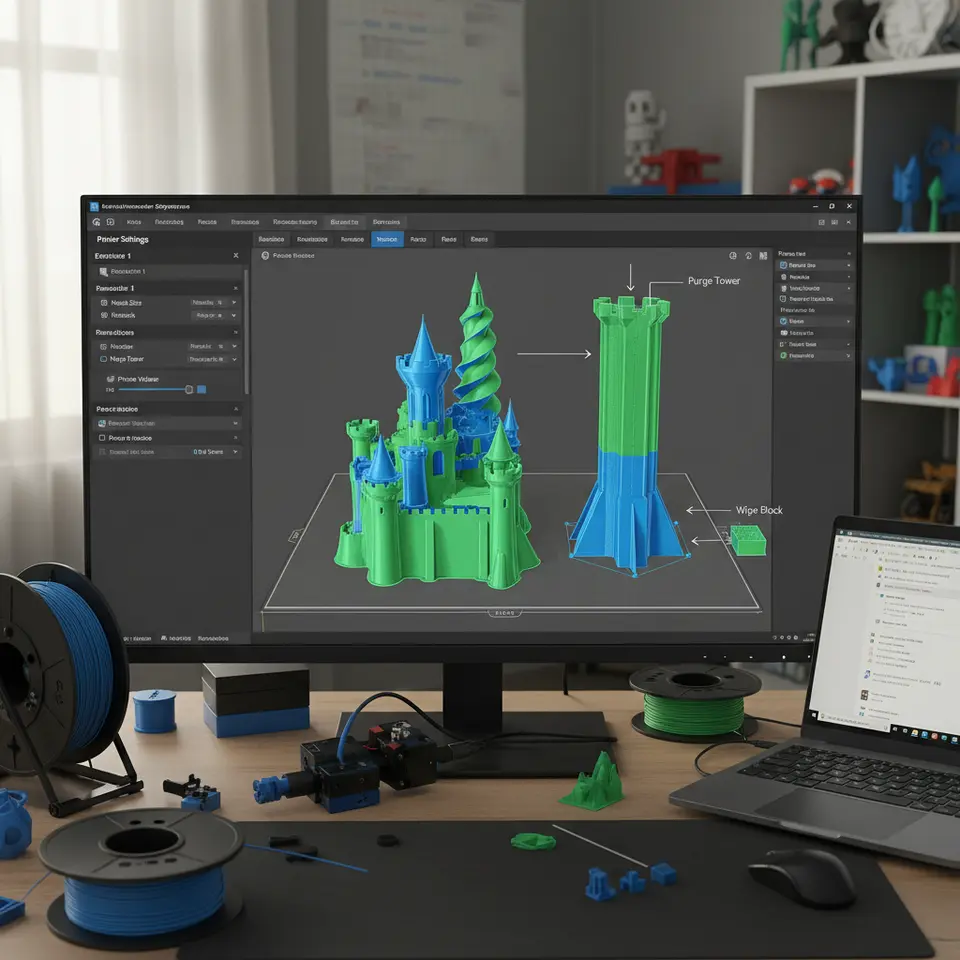
6. Reducing Purge Tower Height – The “Dynamic Tower” Technique
A static tower grows linearly with the number of color changes, but you can shrink it dramatically by enabling Cura’s “Dynamic Prime Tower” (available from Cura 4.8 onward).
- Enable: Print Settings → Prime Tower → “Dynamic Prime Tower”
- Set “Maximum Tower Height” to the height of your tallest layer change (e.g.,
30 mm). Cura will automatically stop printing the tower once the required purges are completed.
Result: In a 150 mm tall model with 6 color swaps, the tower height may stay under 20 mm instead of 90 mm, saving up to 30 % material.
7. Workflow Automation with n8n – From Slicing to Post‑Processing
Optimizing Cura is only half the battle; a streamlined workflow ensures you spend less time tweaking and more time printing. Here’s a quick n8n automation you can set up:
- Trigger: New STL file added to a watched folder (e.g.,
~/3DPrints/incoming). - Action 1: Run a Cura CLI command with your saved dual‑extruder profile:
CuraEngine slice -j dual_color_profile.json -i {{ $json["filePath"] }} -o {{ $json["filePath"] }}.gcode- Action 2: Upload the generated G‑code to your printer’s OctoPrint server via its REST API.
- Action 3: Send a Slack notification with a preview image (use Cura’s
--previewflag).
Benefits:
- Immediate feedback on print readiness.
- For a deeper dive on n8n integration, check out our guide on Enable Z‑hop in Cura – A Step‑by‑Step Guide.
8. Real‑World Case Study: Reducing Waste on a Dual‑Color Vase
Project: Print a 150 mm tall vase with alternating blue and orange PLA layers.
Metric Before Optimization After Optimization Purge Tower Height 90 mm (full tower) 28 mm (dynamic tower) Material Waste 12 g (tower) 4 g (tower + wipe) Print Time 5 h 12 min 4 h 30 min Color Bleed Incidents 3 visible streaks 0 Key Tweaks Applied:
- Set Extruder B temperature offset to +5 °C.
- Reduced travel speed to 150 mm/s and enabled Z‑hop.
The result: A clean, two‑tone vase with a dramatically smaller waste footprint—perfect proof that the right Cura settings matter.
9. Quick Reference: Dual‑Extruder Cura Settings Cheat Sheet
Category Setting Value (example) Prime Tower Enable ✅ Diameter 8 mmMinimum Height 0.8 mmDynamic Tower Max Height 30 mmWipe Tower Enable ✅ Wipe Length 5–8 mmRetraction Distance 6.5 mm(PLA)Speed 35 mm/sTemperature Extruder A 200 °CExtruder B 205 °CTemperature Change ✅ Speed Outer Walls 45 mm/sInfill 60 mm/sTravel 150 mm/sZ‑Hop Enable ✅ Height 0.2 mmPost‑Processing Custom Purge G‑code See Section 4.2 Save this table as a PDF or print it out for quick reference on the shop floor.
10. Common Troubleshooting Checklist
Symptom Likely Cause Fix Color ghosting on model surface Insufficient retraction or no wipe tower. Increase retraction distance, enable wipe tower, or add custom purge G‑code. Huge purge tower Static tower enabled, many color changes. Switch to Dynamic Prime Tower and lower the “Maximum Tower Height”. Filament oozing from inactive nozzle Z‑hop disabled, temperature offset too low. Enable Z‑hop, set a +5 °C offset on the second extruder. Layer shift after color change Travel speed too high during purge. Reduce Travel Speed to ≤ 150 mm/s for dual‑extruder jobs. Clogging after temperature changes Rapid temperature drop/increase without dwell. Add a short M109wait after each temperature change.11. Connect the Dots – How This Fits Into CuraSlicers.com
At CuraSlicers.com we’ve compiled dozens of deep‑dive tutorials that complement this guide:
- Learn how to Print Multi‑Color in Cura for step‑by‑step model preparation.
- Master Cura Support Settings – Effective Tips to combine soluble supports with dual extrusion.
- Explore Cura Speed‑Quality Profiles for balancing fast prints with high‑resolution multi‑material results.
Visit our homepage for a full library of guides, profiles, and community resources.
12. Take Action – Your Next Steps
- Create a custom dual‑extruder profile in Cura using the settings table above.
- Run a calibration print (e.g., a simple two‑color cube) to verify nozzle offsets and temperature offsets.
- Implement the custom purge G‑code if you still see color bleed.
- Set up an n8n workflow to automate slicing and upload, freeing you from manual steps.
- Share your results on our Discord or Instagram and tag @CuraSlicers for a chance to be featured in our “Community Wins” series.
13. Frequently Asked Questions (FAQ)
Q1: Do I need a dedicated purge tower for soluble support extruders?
A: Yes. Soluble support filaments (e.g., PVA) often require a higher purge temperature, and a dedicated tower ensures the support extruder stays clean.
Q2: Can I use a single extruder to print both materials by swapping filaments mid‑print?
A: Technically possible, but you lose the advantage of simultaneous dual‑material printing and risk longer downtime. For true multi‑material parts, a dual‑extruder setup is recommended.
Q3: How often should I recalibrate extruder offsets?
A: Whenever you change the nozzle, hotend, or after a major printer upgrade. A quick “dual‑extruder calibration cube” test takes less than 5 minutes.
Q4: Does enabling Z‑hop increase print time significantly?
A: Only marginally (≈ 2–3 %). The benefits in preventing nozzle dragging usually outweigh the slight time increase.
Q5: Is there a way to automatically delete the purge tower after printing?
A: Yes. Use Cura’s Post‑Processing Script
gcode_modifierto add aM104 S0command that turns off the hotend after the tower finishes, then add aG28 X0 Y0to move the head away for easy removal.14. Final Thoughts
Optimizing Cura for dual‑extruder prints and purge towers isn’t just about saving filament—it’s about unlocking the full creative potential of multi‑material 3D printing. By mastering prime‑tower vs. ooze‑shield decisions, fine‑tuning temperature transitions, and automating your workflow with tools like n8n, you can achieve cleaner prints, faster turnaround, and a more sustainable printing practice.
Ready to put these tips into action? Download our free “Dual‑Extruder Master Settings” PDF from the sidebar, and start experimenting today.
Call to Action:
- Explore more: Check out our guide on Cura Ironing Test to improve surface finish on dual‑extruder prints.
- Stay updated: Follow CuraSlicers on Twitter, Instagram, and LinkedIn for daily tips and community showcases.
- Never miss a guide: Subscribe to our newsletter for exclusive profiles, G‑code snippets, and early access to new tutorials.
Happy printing, and may your colors stay vibrant and your towers stay tiny!